
AI-powered Development: Less Code, Max Shipping
Discover the future of software development with AI, enabling faster app builds and shipping with minimal coding. This playbook explores the tools and strategies to maximize impact.
Nowadays, you can build apps without knowing how to code even not writing single line of code with AI tools. A lot of people with no coding/programming background already shipped their apps (SaaS) with help of AI tools without writing a single line of code.
But, there would be a lot of errors and bugs, and the app wouldn’t work anyway especially on production.
Well you can just debug and fix the errors, ask LLM to fix the code, improve the code, explain the code, and repeat the process until it’s done. Also read the error messages so you can understand what’s wrong, the root cause of it, and how to fix it.
It only works for simple apps or MVP, you can’t use AI to build more complex apps or bigger projects.
I saw a lot of people with no coding background or experience able to ship their apps through AI tools, so all I can say is it’s skill issue. You can just do the thing now.
Even though I’m quite optimistic that people with no coding background or experience can ship their apps through AI tools, they still need to learn and understand the basics and foundation of software development especially core developer tools such as git, docker also know how websites and computer works. What i mean by how websites and computer works is you understand how is the internet works, how website is hosted, what’s api, basic data structure, and the list goes on. People with engineering/CS background have more privilege to build things as they know the fundamentals of problem solving such as breaking down the main problem into smaller sub-problems (modularization), identifying the root cause of the problem, algoritm, archtecture & system design, discreth math etc. I can say this as biomedical engineering graduate that learned basic engineering, programming, and network communication in university and it’s literally help me a lot on programming part.
The you learn more about it, more benefit you will get in the long run when you are building things through code AI tools. You still have to review code that generated by AI wheever it’s implement best practices for your specific app or it just generate slop code. This is important because several times I’ve reviewed code that generated by LLM and many of it does not implement code that i want and some of it breaking the app (even make the app worse).
There is many AI tools out there, but I’m only going to cover the tools I use. Current AI tools I use for both prototyping and production-grade level app development:
- Cursor as the default IDE for AI-pair programming
- v0 to generate/modify UI components, pretty UI prototyping
- Bolt as a fullstack app generation platform, can be used as MVP/prototyping and production-grade level apps as it’s support Supabase now
- Lovable, previously GPT Engineer, AI fullstack software engineer (I would say Lovable is Bolt competitor). Lovable is commercial version of GPT Engineer, you can still use GPT Engineer (open source) here
- Claude for coding assistance in general (still the best LLM for coding/app development for me especially web development) and its API key. Don’t forget to use Sonnet 3.5 one
- ChatGPT for brainstorming and idea generation (Gemini & Claude might work too). It’s newest model, o1, is so good for coding and math too
- Aider, AI pair programming in your terminal (rarely use it)
- Replit, AI-powered app builder, similar as Bolt and Lovable
There is many more AI tools out there, you can check curated list of AI powered developer tools here.
Note: I’ve only paid for Cursor and Openrouter API key (for accesing many LLMs) only, the rest are free.
This fullstack app development approach, with almost 70-99% AI-generated code, works really well for web development, specifically on the front-end side (no-brainer, as frontend can be fully generated by LLMs). The downside of this setup is inconsistent coding style and messy code that needs to be cleaned and reorganized to be maintainable & readable also the more complex the app, the more difficult it is to generate the code and clean up the code mess.
For example, AI-generated code might be written entirely in a single file when it would be better modularized (by sub-problem, feature, etc.) for easier maintainability. AI-generated code also often includes unnecessary code that doesn’t need to be there and frequently contains mistakes. As a result, to make our code production-ready, we often have to do extensive debugging at the end.
Another downside is the cost of using LLM APIs and tool subscriptions, with services like Cursor, Claude, Replit, and v0 each costing around $20 per month, although you can still work within their free usage limits.
In the end, AI-generated code works the best as boilerplate for app development or MVP rather than end-to-end production-grade level fullstack development. It significantly reduces development time - apps that would typically take 2 weeks to develop can be completed within *1 - 2 days.
Playbook
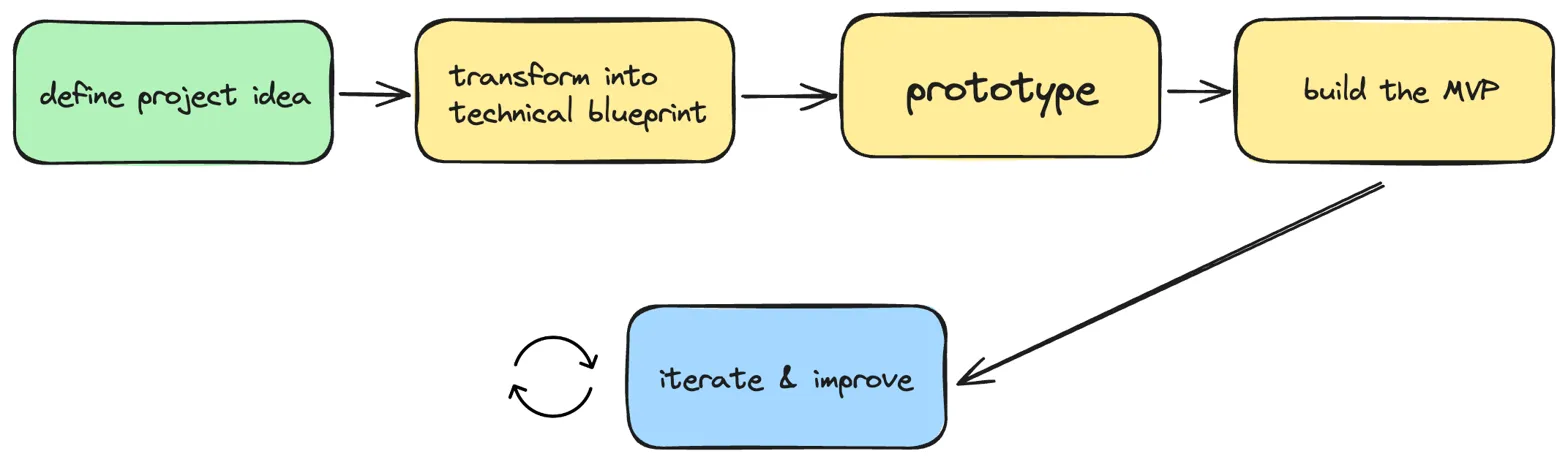
So here is the playbook flow to streamline development process with AI tools.
1. Define project/product idea
Clearly articulate your project idea specifically the vision, features, and requirements. It’s also good if you identify the problem and the user need too. You can brainstorm, generate ideas, and discuss with LLM too such as ChatGPT o1 and Claude Sonnet 3.5.
2. Turn your product/project idea into technical blueprint
After defining and breaking down your idea, the next step is to turn it into technical blueprint. This is great especially if you don’t know where to start. Ideally, technical blueprint includes the project structure, architecture breakdown, project components, and other technical details. In this step, you define all you need to implement on your project such as UI/UX style, frontend components, backend API, database schema, etc.
This technical blueprint will be used as a project reference for your cursor composer and for making prompts to generate prototypes, which will be discussed later.
Here is the example of prompt to transform your idea into technical blueprint (generated by Claude Sonnet 3.5):
You are tasked with transforming a product or project idea into a comprehensive technical blueprint. This blueprint will serve as a guide for developers and engineers to understand the technical requirements and architecture of the proposed product or project.

First, carefully read and analyze the following product/project idea:

<product_idea>
{{PRODUCT_IDEA}}
</product_idea>

Now, follow these steps to create a detailed technical blueprint:

1. Analyze the product/project idea:
   - Identify the main purpose and goals of the product/project
   - Determine the target audience and use cases
   - List any constraints or specific requirements mentioned

2. Identify key components and features:
   - Break down the idea into core functionalities
   - List any additional features or nice-to-have elements

3. Outline system architecture:
   - Propose a high-level architecture (e.g., microservices, monolithic, serverless)
   - Describe the main components and their interactions

4. Specify technologies and frameworks:
   - Recommend programming languages, frameworks, and libraries for each component
   - Justify your choices based on the project requirements and industry best practices

5. Define data models and storage:
   - Outline the main data entities and their relationships
   - Suggest appropriate database technologies (e.g., SQL, NoSQL, graph databases)
   - Describe data storage and retrieval strategies

6. Describe API endpoints and integrations:
   - List key API endpoints for the product/project
   - Identify any third-party integrations required
   - Specify authentication and authorization methods

7. Consider scalability and performance:
   - Propose strategies for handling increased load and user growth
   - Suggest caching mechanisms and performance optimization techniques

8. Outline security measures:
   - Identify potential security risks and vulnerabilities
   - Recommend security best practices and measures to implement

9. Propose development phases:
   - Break down the development process into logical phases or sprints
   - Prioritize features and components for each phase

After completing these steps, present your technical blueprint in the following format:

<technical_blueprint>
1. Executive Summary
   [Provide a brief overview of the product/project and the proposed technical solution]

2. System Architecture
   [Describe the high-level architecture and main components]

3. Technologies and Frameworks
   [List and justify the chosen technologies]

4. Data Model and Storage
   [Outline the data structure and storage solutions]

5. API and Integrations
   [Describe key API endpoints and third-party integrations]

6. Scalability and Performance Considerations
   [Explain strategies for handling growth and optimizing performance]

7. Security Measures
   [List security best practices and implementation recommendations]

8. Development Roadmap
   [Outline the proposed development phases and priorities]

9. Conclusion and Next Steps
   [Summarize the blueprint and suggest immediate actions to begin development]
</technical_blueprint>

Ensure that your technical blueprint is comprehensive, well-structured, and tailored to the specific product/project idea provided. Use technical language appropriate for a development team, but also make it accessible for non-technical stakeholders to understand the overall architecture and approach.
You can also use this project blueprint generator tool to generate technical blueprint for your project idea. Here is video demo of it.
3. Prototype
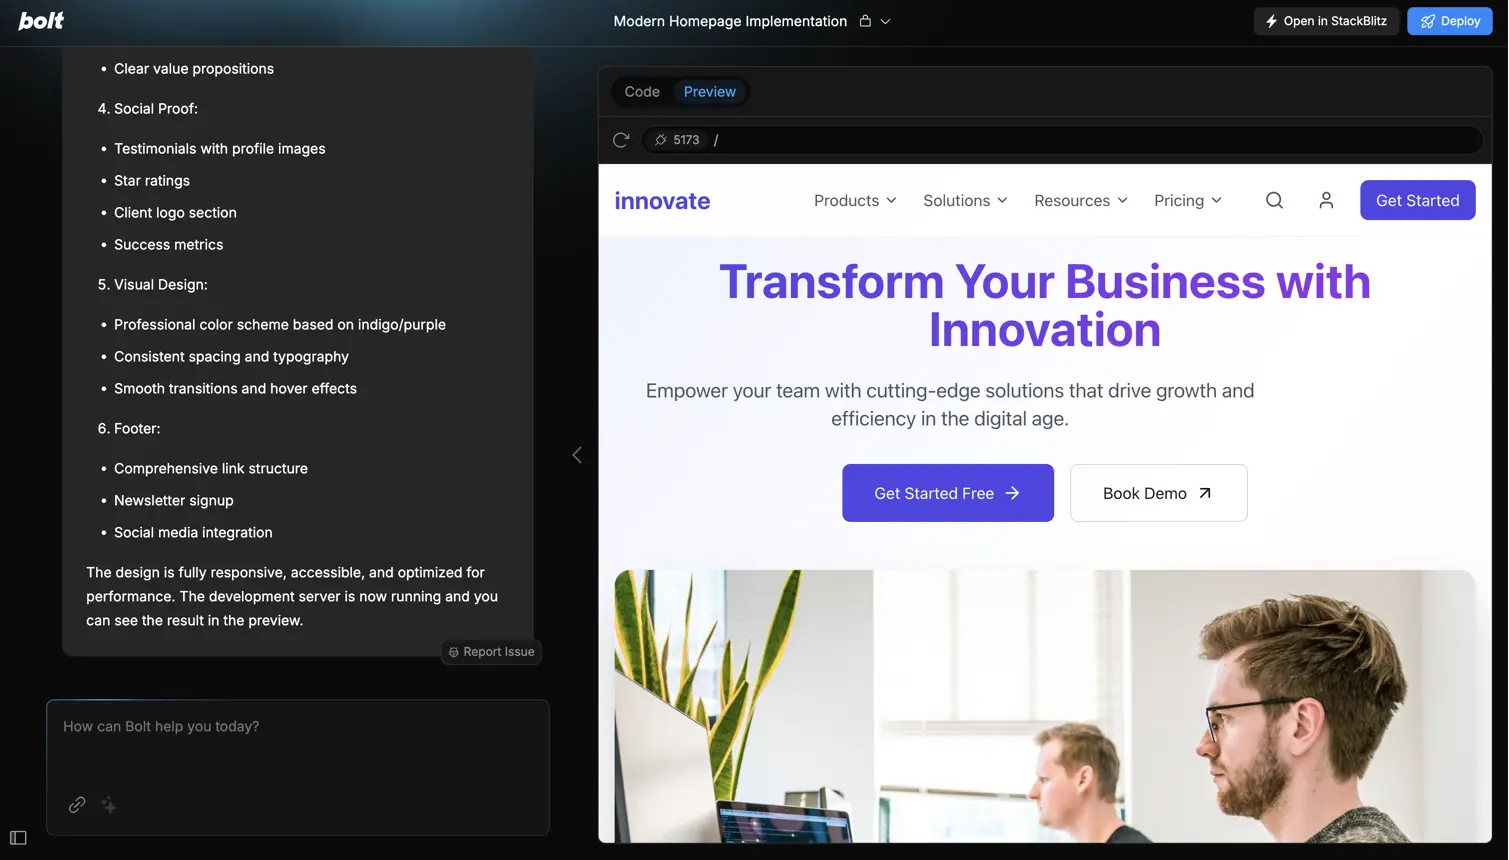
From your technical blueprint you made, now you can directly copy paste the technical blueprint text right into fullstack app generation platform I mentioned before such as Bolt and Lovable as prompt.
- Make a prototype directly on Bolt, Lovable, or Replit (my usual go-to is Bolt)
- Revise and improve it until reaching the limit or achieving a satisfactory look (based on the overall vibe)
- From the Bolt web interface, you canexport the repo to GitHub, clone the repo, debug and make further improvements > evaluate and repeat on Cursor until reaching production-grade level. You can deploy directly from the Bolt web interface using Netlify.
For UI/UX prototyping and styling, you can depend on v0 for it. It can also be used for creating and styling components. This works particularly well for frontend development, especially with a React + NextJS + Tailwind CSS setup.
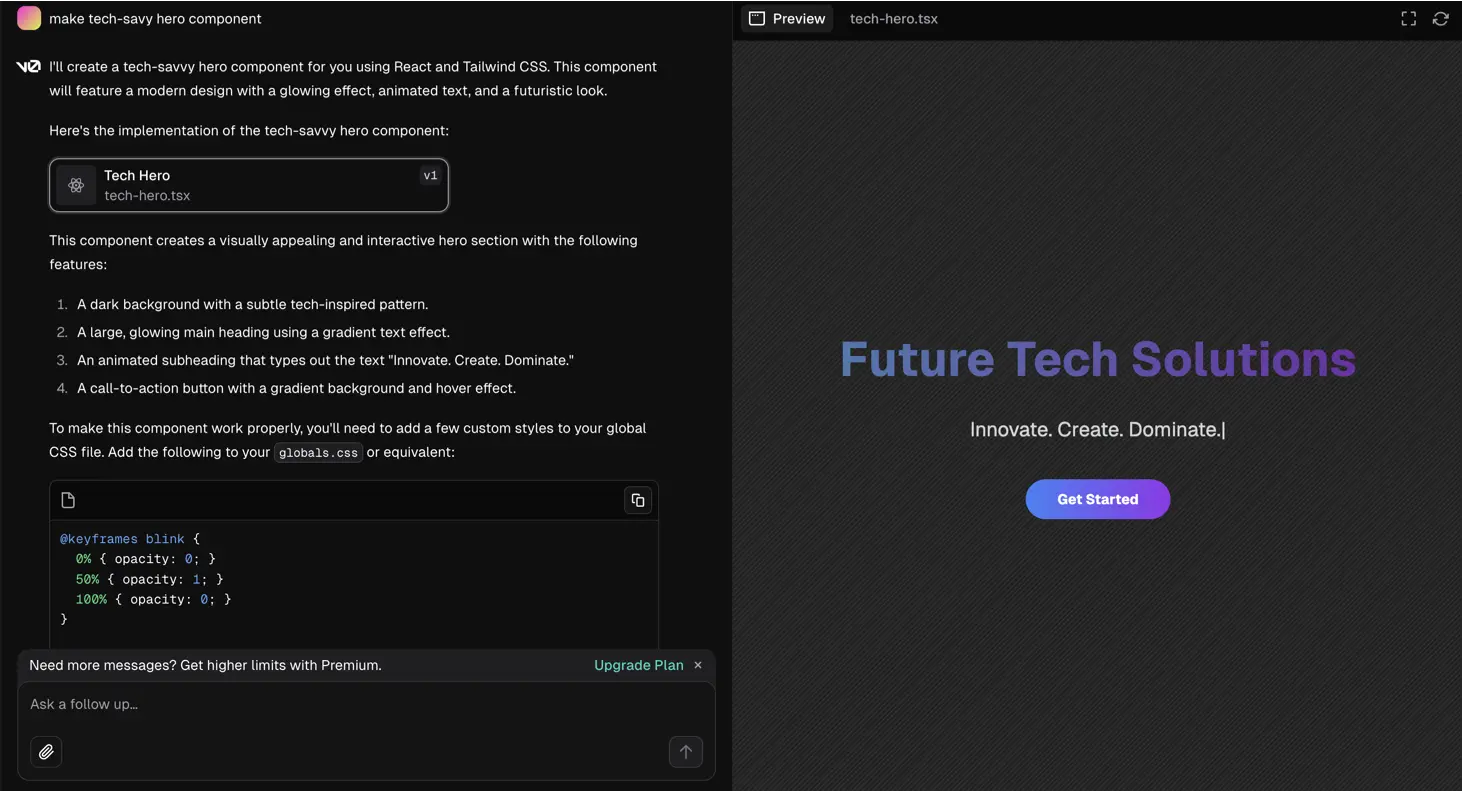
As v0 itself now able to modularize project files, you can use v0 to generate UI and style components, and then use Cursor to improve the codebase from v0 project folders/repo. It also able to import from Figma project, so it’s even easier to generate UI/UX prototype directly from your Figma project.
Now, there is 21dev which is open source curated collection of shadcn and react components that optimized for AI code tools such as v0 and bolt so you can leverage this to generate prettier and cooler UI components.
4. Build the MVP
As you already did prototyping, now you can move to building the MVP phase. You can export prototype apps from bolt, lovable, or v0 into github repo and clone the repo and start writing code improve current prototype into working MVP. If your prototype is accidentially already working and includes all of the core features of your product, you can directly deploy it to production (make sure to test it and qualify it first especially security and performance). About deployment to production will be discussed later.
You can also build the MVP app from scratch using cursor composer. Turn your technical blueprint earlier as markdown file to use it as cursor rules. Cursor rules will be used as prompt to generate codebase and as LLM reference to build and improve the codebase. It’s recommended to use it so cursor composer can generate code based on what we want and we could get less error and bug. Here is a list of cursorrules that you can use as cursor rules reference.
As I’m writing this, there is a new Cursor Composer feature called agent mode, which can autonomously crawl the entire codebase to improve, add, and fix code based on the prompt. This feature should make the devlopment process easier and faster.
While I’m a paid Cursor user, free users are limited to using Composer and its features. However, free users can still add their Claude API key in Cursor settings (though autocomplete feature still being limited). Alternatively, you can use Github Copilot (now freemium) or Continue.dev (a VSCode/JetBrains extension) as alternatives to Cursor, since Cursor itself is a VSCode fork.
5. Iterate & improve
The final part is refine the product based on feedback and continuosly enhance features and performance of your app. You can collet feedback from users that use your app and analyze feedback to identify areas for improvement. To collect feedback, ofcourse you need to deploy your app to production first. We will discuss it after this.
You may wonder why is it building MVP first instead of building finished product/app instead. As you can see, these AI tools is really great for generating boilerplate code and really suitable for MVP building but for actual finished product or launching finished app, you still need to do a lot of things outside of these AI tools such as proper testing. Later, we will discuss more about this testing stuff and software development cycle even though not really related to AI tools, it might help you to understand the development process better (there is AI-based testing tools too mentioned later).
Development cycle & testing
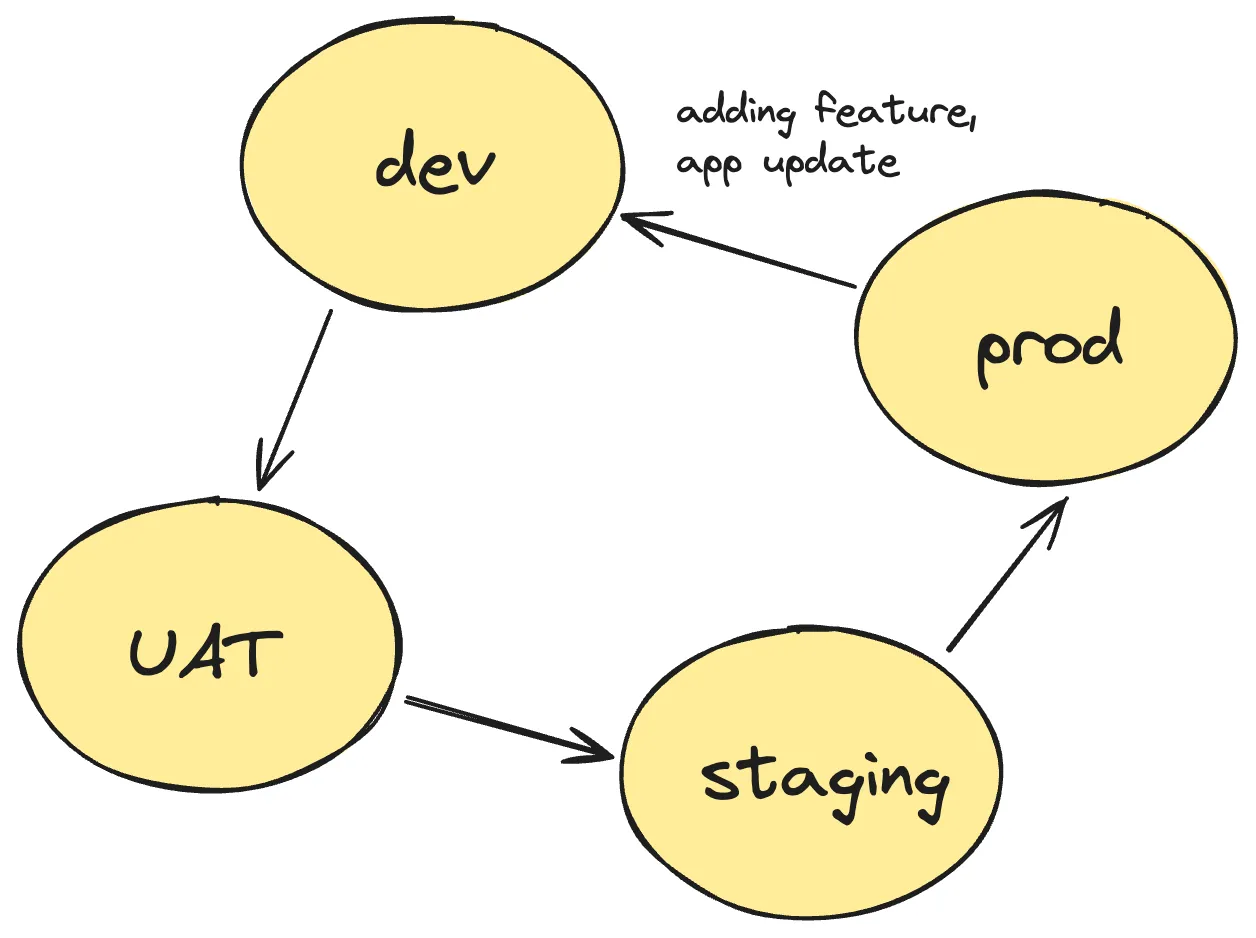
Software development lifecycle environment usually goes from development, testing (UAT), staging, to production environment (app is live).
- Development - Development environment (localhost) for building your app (coding, testing, and debugging).
- UAT - UAT stands for User Acceptance Testing. This is testing environment for validating user requirements and features.
- Staging - Pre-production environment for testing and validating the app before it’s ready for production (quality assurance).
- Production - Environment where the application is live and available to end-users.
This testing process aka quality assurance could be done manually and automatically (usually both). Testing has a lot of types such as unit testing, integration testing, end-to-end testing, etc. I would not really go deep into testing and quality assurance here as it could be a long post and separate topic. I mention this development cycle and testing for people that not familiar with it so you can understand the development process better from building app to deployment process, there is testing process too.
We can understand this testing process easier with example. If you build app with backend rest api, database, login auth, stripe payment api, and more, ofcourse you want to test and validate all of it to make sure the app works and there is no bug & to prevent crucial error before production. You want to make sure all of testing flow metrics are good and stable before production. This is where quality assurance comes in. Ideally, you can manually test your app with a lot of test cases and scenarios to make sure the app works as expected. Then there is also automated testing too make your testing process faster and more efficient (such as using Github Action for CI/CD pipeline). Now you get the idea of why testing process is important. You can let LLM to generate unit testing and integration testing for you.
There is open source AI-based natural language testing framework (specifically for end-to-end testing) you can use which is Shortest. You can write what do you want to test using plain English and it will generate test cases and scenarios for you (see the demo in in the link).
Deploying to production & hosting
This entire section actually better to be made as another post as I think it could be a long post and separate topic but the idea is you should able to differentiate and understand between local development and production. It would be funny if you done all the steps above and share your app to your friend or even in public (social media) and share your app url as https://localhost:3000.
About web app deployment, there is a lot of free providers out there. For example, you can use GitHub Pages to showcase your open source project and host a blog. Vercel, cloudflare, fly.io, and netlify are also free and easy to use as deployment provider (freemium). Remember that these providers are not entirely free, as some of deployment providers strictly limit some of access and you can get surprise bill if you are not careful (ex: vercel serverless bill and AWS bill). You will also need to pay for domain name (if you are not comfortable with free domain name).
You can also try host it using cloud provider such as Amazon Web Services and Google Cloud Platform as they are providing free credits (around $300 if I remember) which is enough for trying out and hosting your app for a while. As cloud deployment is expensive especially if you want to scale your app, I personally recommend to try self-hosting on your own server (VPS) instead. It’s much cheaper and more flexible even though for the first time it’s hard to setup.
You can buy domains from various site. My usual go-to website to buy domains:
Some of these domain providers also offer other benefits such as free SSL certificates, free email hosting, email forwarding, free hosting,and more so you can research first which domain provider site is the best for you.
End of post
AI Code is new No-Code, and it might be the future of software development. It’s not just about writing less code, but also about creating more efficient and innovative solutions. You don’t need to remember all the syntax and every programming language to build your app. You can just write your idea in details, proper English, well-structured, as prompt, and AI will do the rest. It’s even better if you understand basic and foundation of software development and project management as it will make the development process easier and faster.
Also back to the beginning, you still have to learn and understand the basics and foundation of programming as it will make the development process easier and you will struggle less in the long run.
I might add more to this post and update it as I discover new tools or more efficient and better ways to do it and explain it better.