"Dockerize Everything" Approach for Easy Self-Hosting Server Setup
Utilizing docker to manage your server and its deployment.
Cover featuring artwork by @_liellac
Recently, I love exploring and tinkering with server and infra stuff. I bought VPS from Contabo to tinkering with server and doing a lot of stuffs there. I have wishlist of building proper homelab setup one day, but for now I will be using VPS as my own server to building and self-host several apps. I really love the concept of having your own server and self-hosting your as there is more flexibility and control is in our hand. Thus, you can test and explore what do you want in your server and you can design your own infrastructure and platform to build on. This is same similar concept as using linux as your operating system for more control and accesibility rather than using windows.
As you can see, its common to host your own website or app on cloud platform such as Vercel and Heroku for easier deployment. Despite these cloud platform made deployment easier, they have hidden cost. You dont really have full accesibility and control of your server and it has some kind of vendor lock-in mechanism in there, you need to pay for more access, features, further management, and accesibility. If your apps have big amounts of traffic, you could get surprise bill from these platform (good problem to have tbh).
This is where dedicated/private server come in, you can fully control your own server, infrastructure, and deployment platform on yourself, especially with Docker, open source dev tool that you can use to package your software and its dependency into a portable container to deploy your app. Docker provides OS-level virtualization to deliver software as a package called containers. You can even run multiple docker containers using Docker Compose defined in YAML file, we will explain about docker further later.
Inb4, some of you maybe thought that “So are we container-ing every apps and service as dockers in our server and make our server into GUI-based VM rather than it is?”
The answer is yes and it might be worse method for make actual production-grade ready server especially for scaling and not effective approach. This blog was purely made to log and journal my devops & server learning experience that may help someone understanding server, devops, sysadmin, container/docker, etc for their learning journey.
Getting Your VPS Ready
Now, as we want full control, predictable pricing, and the power to build your infrastructure your way, the first thing we need is your own server. You can start it by setting up your Virtual Private Server (VPS).
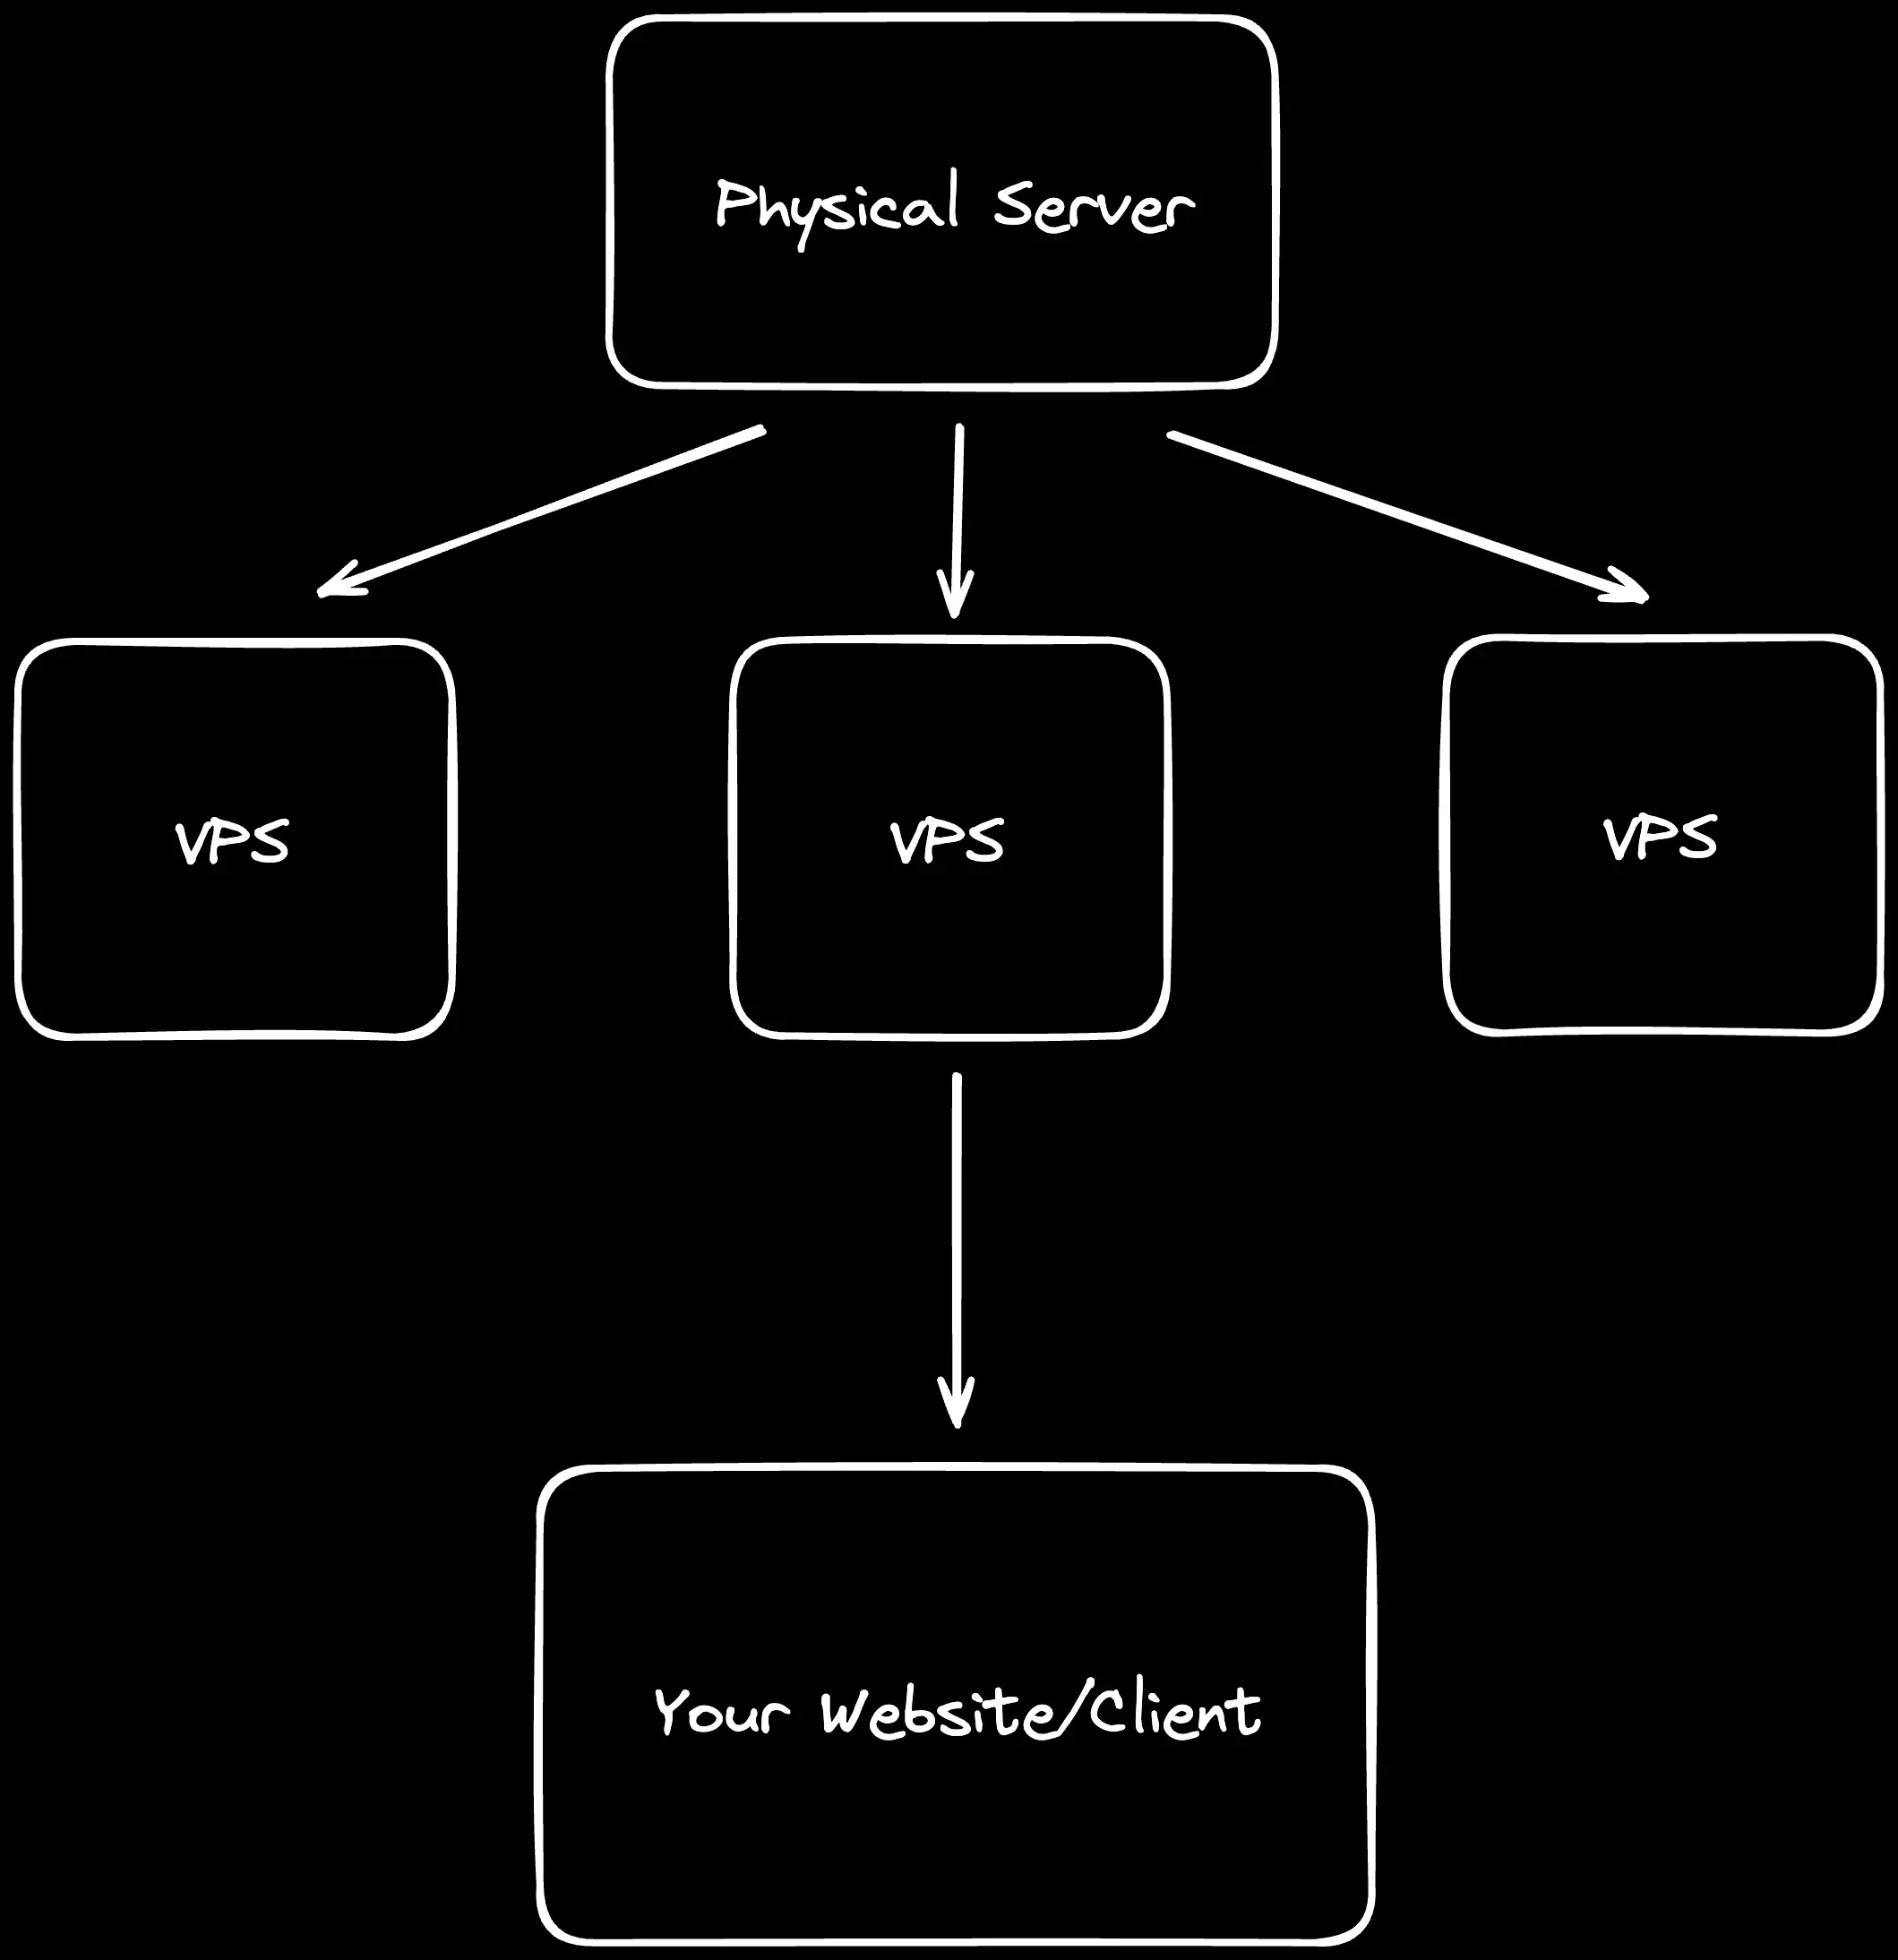
VPS is a isolated virtualized server that provides dedicated resources, splitted from a single physical dedicated server (bare metal) using virtualization technology. Each VPS runs its own operating system and has it own dedicated resources (CPU, RAM, storage, etc.) which is giving you the control and flexibility of a dedicated server but a much lower cost. Its like renting private room in a large building. You have your own secure space that you can customize as much as you want, but you share the building’s overall infrastructure with other tenants (it’s different than shared hosting). This allow you to host applications, websites, gaming server, or workers (scraper, crawler, AI agent, etc).
There is plenty providers you can choose to start setting up your own VPS. Here is few provider recommendation I could give.
PS: this is my personal recommendation and not shill as I dont setup referral url on there also do your own research too.
- Digital Ocean: Developer friendly VPS (Droplet in DigitalOcean) provider as there is resource observability interface available in their droplet dashboard. You can get $200 credits for signing up there (60 days). This is great start for first timer as you can try it for free using free credits and there is droplet dashboard for basic server monitoring stuff. You can get DigitalOcean free credits with GitHub Student Developer Pack too.
- Hetzner: One of the most popular server provider due to its cheap pricing while having reliable and performant server. They have decent customer support too. You can try their server start from €3. I would recommend this provider to start your server-tinkering journey.
- Contabo: This is also server provider that has decent price-to-performance ratio. It’s one of the cheapest server provider I have found and really great for poorfag (like me). I also use deployed several side projects and company internal tool using their server (contabo team, plz sponsor me). For choosing VPS, it’s up to you which distro is comfortable for you (just pick Ubuntu 22/24 or the stable one for common option).
You can also rent VM from giant cloud providers like AWS and GCP using their free sign-up credits but don’t forget to cancel your credit card payment if your free trial time is due (becareful with your bills lol).
VPS Initial Setup
After bought your VPS, log into your server as root user on terminal with ssh root@<your ip here> then update your package index and kernel right away with sudo apt update && sudo apt full-upgrade -y. Then, create new user and give it sudo rights so you don’t need to log as root for server management using adduser <your-vps-username> and usermod -aG sudo <your-vps-username>. In /etc/ssh/sshd_config path, you can set PermitRootLogin as no so you can log into your VPS as your user not as root.
After that, lets setup our server firewall with ufw, if you want to know more about ufw, read here. With UFW, you can set your own server policy which ports explitcitly allowed and which one that dont. You want to expose port that needed to be available as public, so do sudo ufw allow 2222/tcp and sudo ufw allow 80, 443/tcp then do sudo ufw enable to activate your firewall policy and do sudo ufw status numbered to see your firewall status and its activated port. For private instance, such as your sql database on your server, you can do ufw deny 5432/tcp as port 5432 is default sql database port.
After that, generate and set up your own SSH key for your VPS access. We will use SSH key to log into our server rather than password for more secure access as the key is stored in your local/client machine. SSH key-pair generates two files together, private key and public key. The private key never leaves the client machine while public key is copied to the server. To generate ssh key, you can do ssh-keygen -t ed25519 -a 100 -C "rsydn@lthinkpad" -f ~/.ssh/id_ed25519 for example. -a 100 means runs 100 rounds of the key-derivation function to slow down offline brute-forcing of your passphrase. To getting public key into server, for example, you can do ssh-copy-id user@<vps-ip>. You can do it manually too using cat command. As this SSH key thing is really that crucial on set up your own server journey, you can read more dedicated comprehensive guide on Digital Ocean’s blog and
SSH Academy. You can also setup more advanced way to log into your server like bastion hosting or SSH tunneling.
Docker Container as Core Server Infrastructure
Alright, continue about this docker thing, we will expand further what the hell is docker and why is it making self-hosting setup easier (atleast for newb like me) even though there is several self-hosting and deploying ways that might be more efficient and sometime its easier to do like using systemd.
What is Docker?
So, docker is a platform or tool that uses containerization technology to package applications and their dependencies into portable and lightweight containers (even though sometimes, docker can be heavy if your setup is not optimized). You can imagine it as contained boxes that include everything needed to run your application such as codebase, libraries, system tools, environment configuration, etc. So you wrap this whole things and tools you need to run and deploy the application or server in the container box. With this container box, other developer and user can try test the application with consistent and same setup and configuration within the container box. You can check further explanation about it on their docs and ask LLM about it (there is too much info and I couldnt write it lmao, you should check it out). There is four docker components that i might expand here which is images, containers, networks, and volumes.
Docker images are read-only templates and one of docker foundation used for creating containers. Its like recipes that define the base operating system, application code, dependencies and libraries, and environment configurations.
Here is the docker images (dockerfile) snippet example:
WORKDIR /app
COPY package*.json ./
RUN npm install
COPY . .
EXPOSE 3000
CMD ["npm", "start"]
What does the dockerfile snippet above is start with minimal nodejs 16 with linux-alpine OS environment then create /app directory to hold application. It copies the only dependency manifests there then install the dependenices. After that, it copies the rest of application code and declare the app will run on port 3000. Finally, it sets the default startup command to npm start.
Second, containers, as i explained before, they are running instances of docker images, isolated environment where your applications execute. They are isolated from other containers, share the host OS kernel, can be started, stopped, and deleted easily.
Third, volumes are docker’s preferred mechanism for persisting data. They offer data persistence beyond container lifecycle, easy data sharing between containers, better performances than bind mounts, and backup & migration capabilities.
Docker Compose, Simplifying Multi-Container Applications
Docker compose allows you to define and run multi-container docker applications using simple YAML file. Instead of running multiple docker run commands, you define your entire application stack in one YAML file then run docker compose command instead.
With docker compose, you can declare the configuration of your whole application stack in a single docker-compose.yml file then use docker compose up command for docker container deployment. You can also manage and switch docker container environment between development/local, testing, and production configurations. Docker compose also able to automatically handle container dependencies and startup order. Containers can also communicate using services name. Here is example of docker compose configuration:
version: '3.8'

services:
  # Caddy Reverse Proxy - Automatic HTTPS!
  caddy:
    image: caddy:2-alpine
    ports:
      - "80:80"
      - "443:443"
    volumes:
      - ./caddy/Caddyfile:/etc/caddy/Caddyfile:ro
      - caddy_data:/data
      - caddy_config:/config
    depends_on:
      - web
      - api
    restart: unless-stopped
    networks:
      - app-network

  web:
    build: ./frontend
    expose:
      - "3000"
    depends_on:
      - api
    environment:
      - API_URL=http://api:5000
    networks:
      - app-network
    restart: unless-stopped

  api:
    build: ./backend
    expose:
      - "5000"
    depends_on:
      - db
      - redis
    environment:
      - DATABASE_URL=postgresql://user:pass@db:5432/myapp
      - REDIS_URL=redis://redis:6379
    networks:
      - app-network
    restart: unless-stopped

  db:
    image: postgres:14
    volumes:
      - postgres_data:/var/lib/postgresql/data
    environment:
      - POSTGRES_PASSWORD=pass
      - POSTGRES_USER=user
      - POSTGRES_DB=myapp
    networks:
      - app-network
    restart: unless-stopped

  redis:
    image: redis:7-alpine
    volumes:
      - redis_data:/data
    networks:
      - app-network
    restart: unless-stopped

volumes:
  postgres_data:
  redis_data:
  caddy_data:
  caddy_config:

networks:
  app-network:
    driver: bridge
Example above is example of docker compose snippet of fullstack application with caddy as reverse proxy (you can replace it with nginx) consists of frontend (port 3000), backend/api (port 5000), postgres database (port 5432), and redis (port 6379). This is just simple docker compose snippet for example, I will add real application deployment example of what I have used in later section. As you can see in the configuration above, we defined services, services dependation, image (caddy, postgres, and redis), volume for data persistence, network, and filling variables of .env configuration. The visualization of directory structure based on docker compose snippet above could be looks like this:
my-app/
│
├── docker-compose.yml #for testing or dev
├── docker-compose.prod.yml #prod configuration
├── .env.example #.env template
│
├── services/
│   ├── frontend/
│   ├── backend/
│
├── caddy/
│   └── Caddyfile
│
└── volumes/
As my intention here is more of introduction of docker containers and understanding how docker compose functionality used, for actual best practice of docker, you might want to check their official docs (to avoid misinformation by me 💀).
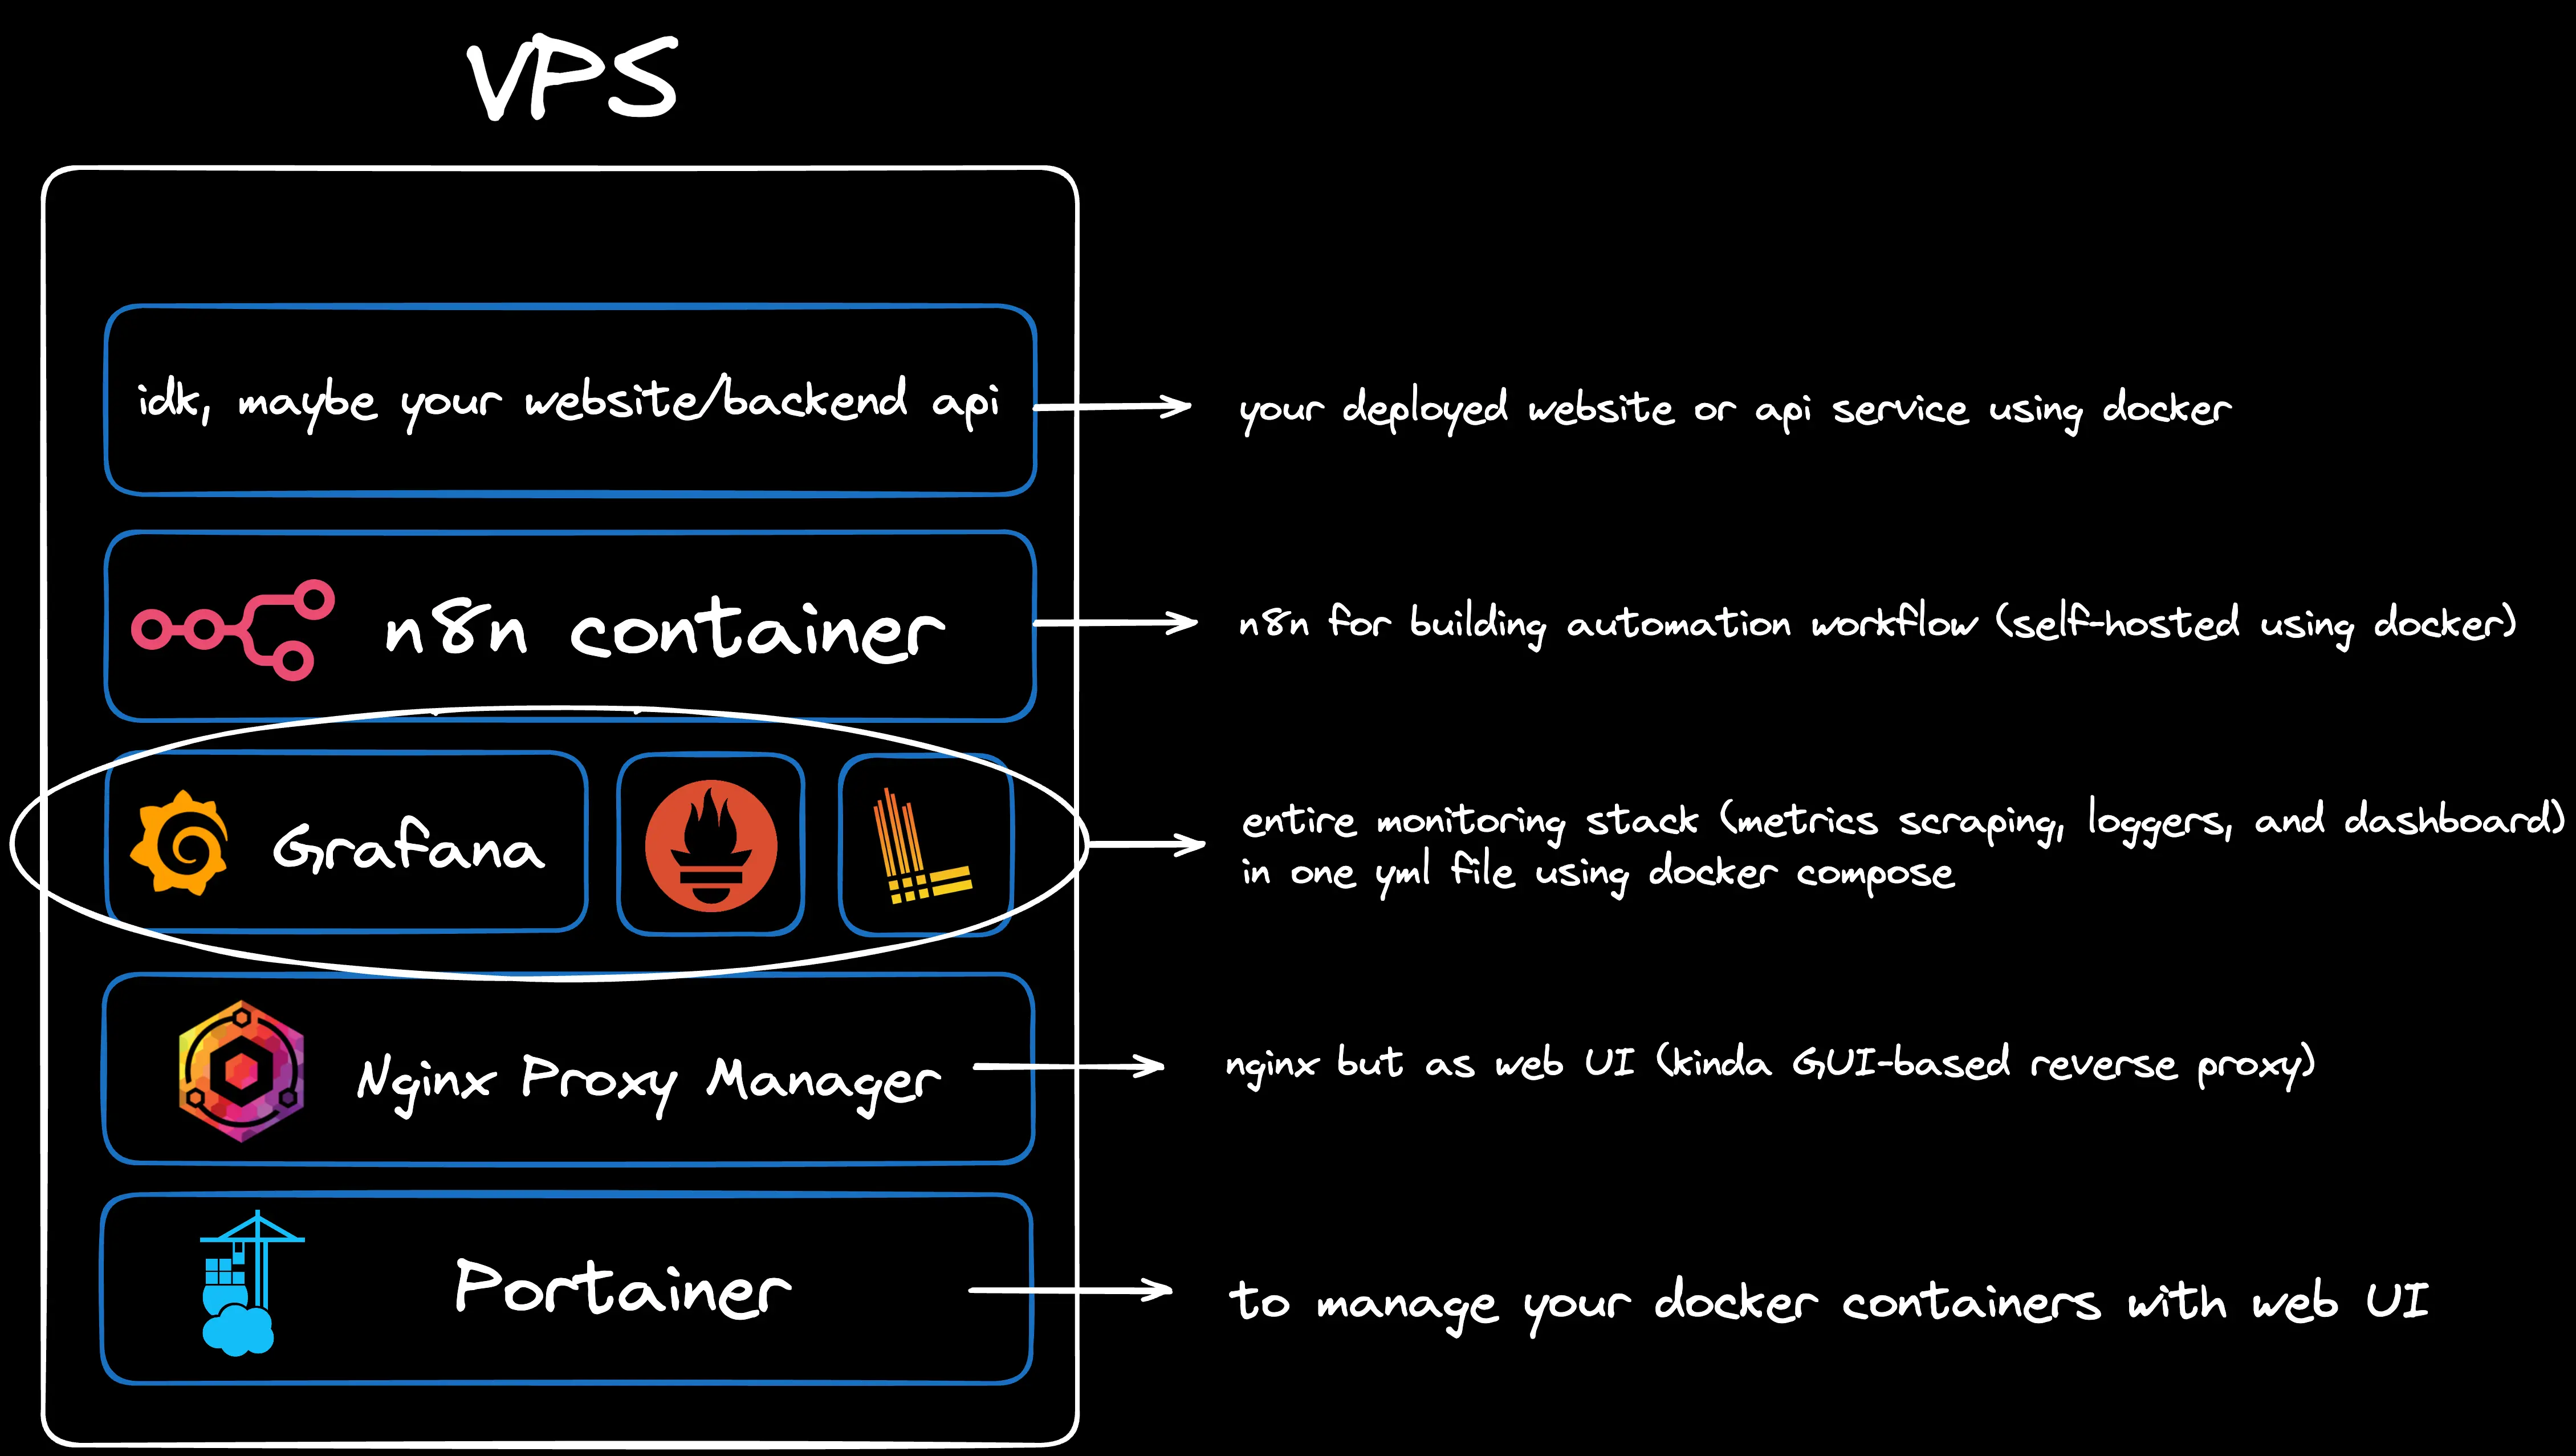
Visualizing Docker as Our Self-Hosting Infrastructure
Now, lets visualize how docker fits into our self-hosting. Here is simple diagram I made on Excalidraw showing visualization of docker containers inside VPS I will use as example in this blog (Portainer, NPM, Grafana , etc.):
This is where Docker becomes game-changing for self-hosting beginner (like me atleast).
In a traditional setup, each VPS would require:
- Manual installation of runtime environments (node.js, conda/pip, php, etc)
- Direct dependency management on the host system
- Complex configuration for each application
- Potential conflicts between different applications’ requirements
- Tedious backup and migration processes
Docker transforms each VPS into a container orchestration platform where:
- Each application runs in its own isolated container
- Dependencies are packaged within containers - no more “it works on my machine” problems
- Consistent environments across development, testing, and production
- Easy scaling - spin up multiple instances of the same service
- Simplified backups - just backup your docker compose files and volumes
- One-command deployments -
docker compose upand you’re live
Think of it this way: instead of installing applications directly on your VPS (like installing software on your computer), you’re running containerized versions of these applications. Each container is like a small, self-contained virtual environment that includes everything needed to run your application.
For example, in one VPS you might run:
- A web application container (your main site)
- A database container (Supabase, PostgreSQL wrapper)
- A reverse proxy container (Nginx Proxy Manager)
- A monitoring dashboard container (Grafana)
All these containers can communicate with each other through Docker networks, share data through Docker volumes, and be managed as a single stack using Docker Compose.
This containerized approach is why Docker makes self-hosting so much easier for beginners, you get the benefits of isolation and consistency without the complexity of managing multiple servers or virtual machines.
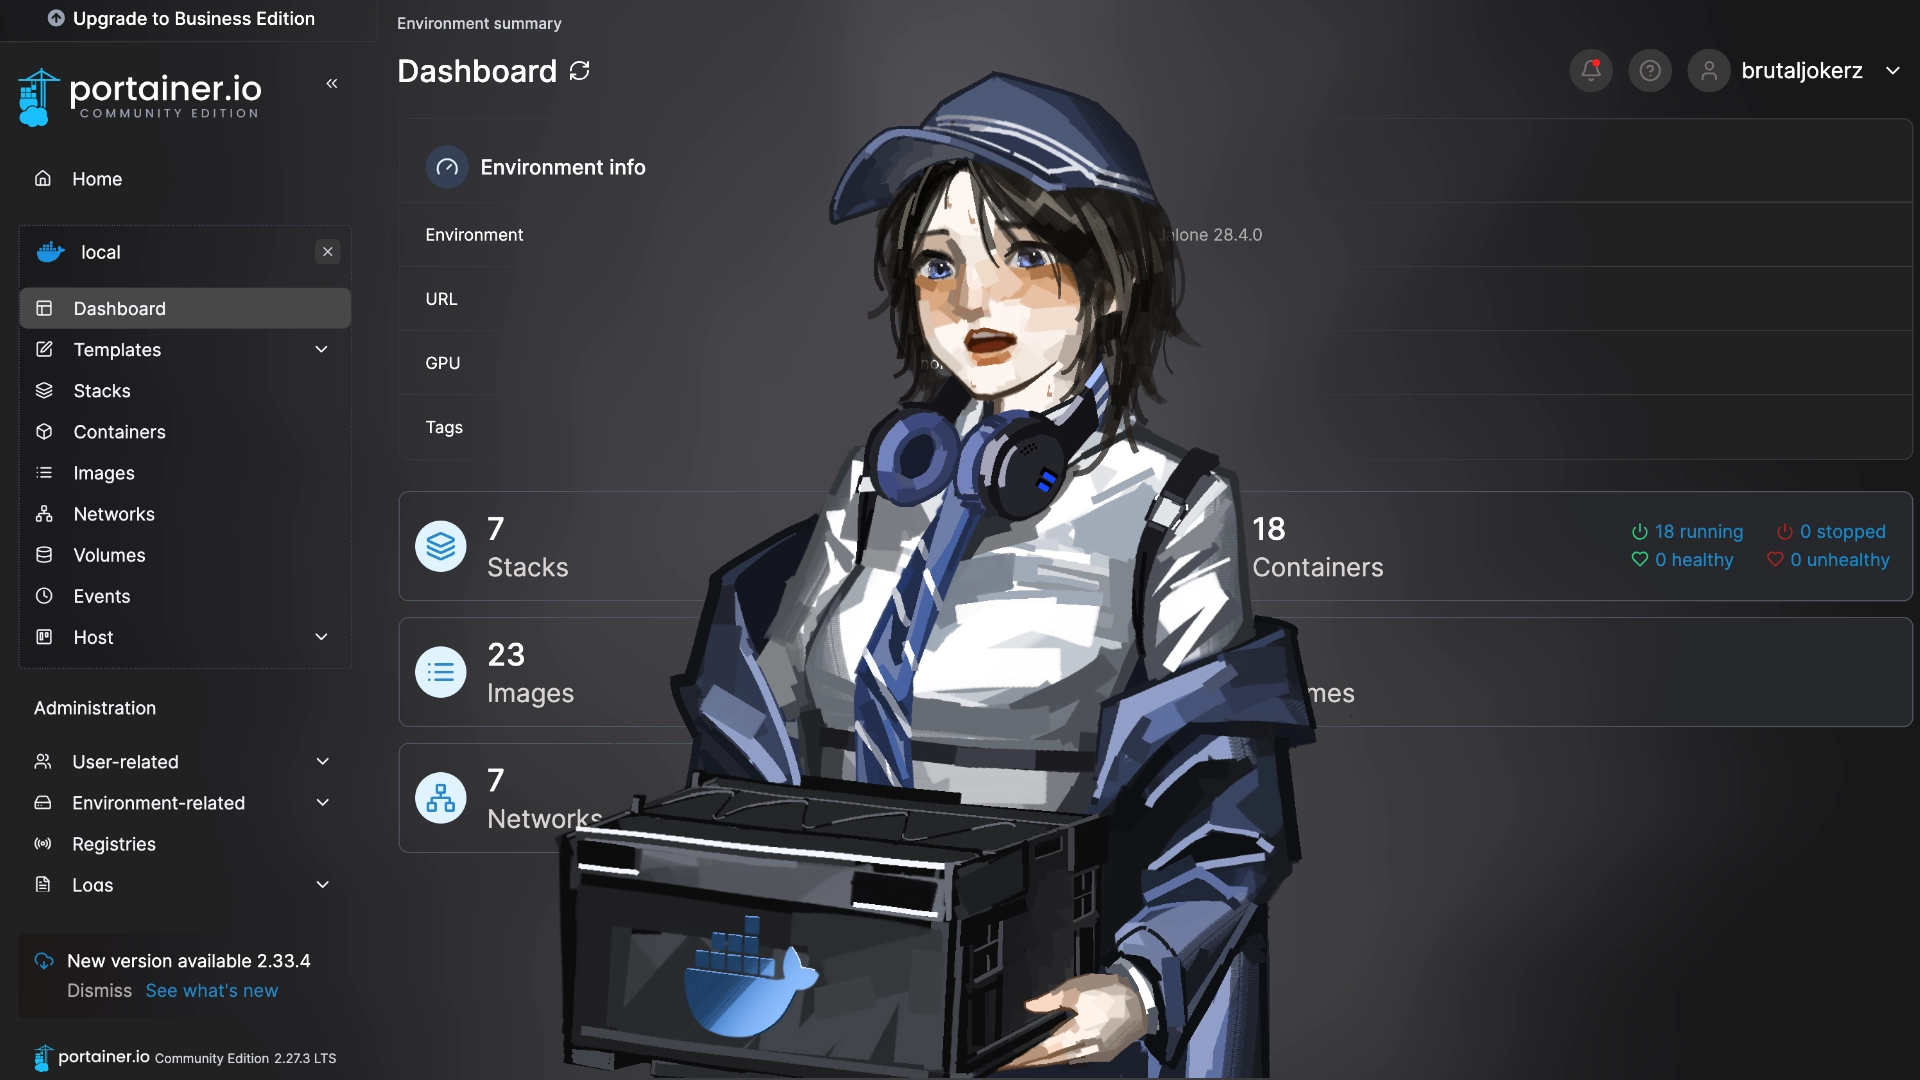
Setting Up Portainer for Docker Management
Managing docker containers through command line is already enough but as first-timer that new to this server and infrastructure thing, you might dont know all the necessary docker commands that you need and maybe you need to ask LLM each times you want to some stuff to your docker or reading docs back to back or looking at docker cheatsheet to do some docker command (based on my experience) also maybe you are not really comfortable with CLI and more comfortable using GUI instead. This is where Portainer come in, a lightweight and open-source management UI that allows you to easily manage your docker environments through web interface.
Key advantages of using portainer for docker management:
- Visual container management: you can see all your containers, images, volumes, and networks at a glance. Usually you are seeing all of your docker containers through
docker pscommand on your server CLI that might not comfortable for certain people (people that prefer GUI over CLI). With portainer, it might be game-changing for this kind of people. - Multi-environment support: manage local docker, even docker swarm and kubernetes from one interface.
- User-friendly interface: think this is the biggest advantage one as I stated before. You dont need to memorizing docker commands, just clicking~
- Team collaboration: role-based access control for team environments (this is available for business/enterprise edition, as we are using community edition aka the oss version, its not available).
- Real-time monitoring: track resource usage, logs, container health in real-time.
- Template library: deploy application quickly using pre-configured templates such as caddy, sql database (postgres, mysql), wordpress, and grafana.
For portainer (community edition) installation guide, you can check it on their official docs. You can access portainer using desired port (the default is port 9000) on your server. Since it’s still not https enabled and still not configured with SSL, we will setup reverse proxy later using nginx proxy manager in next section.
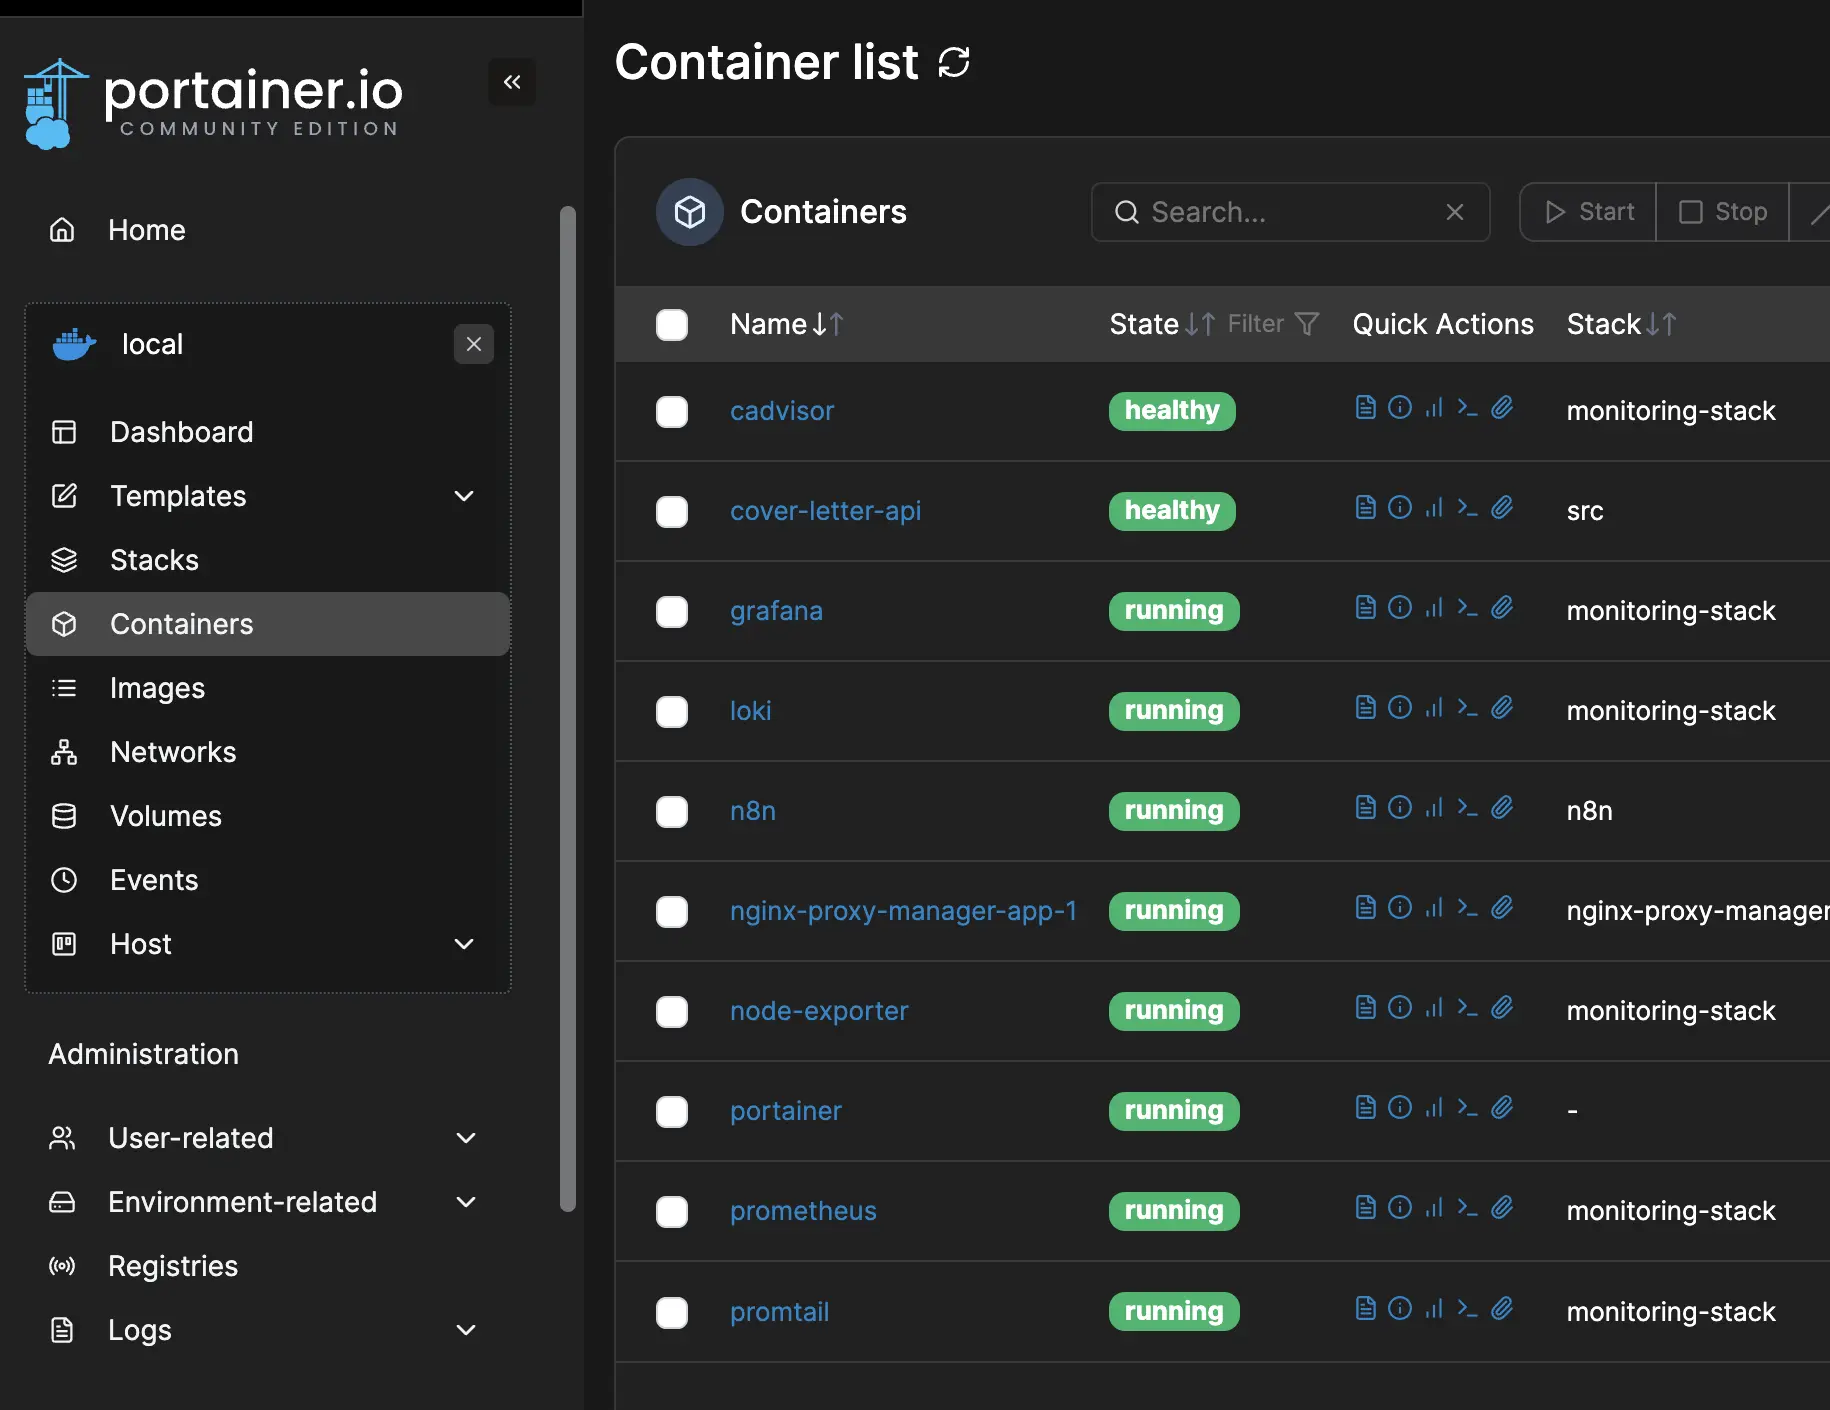
Essensial Portainer Task
Monitoring Containers
Once logged in, the dashboard provides an immediate overview including container status (running, stopped, unhealthy), resource usage (cpu and memory consumption per container), and quick stats (total containers, images, volumes, and networks)
Managing Container Lifecycle
You can start or stop, even restart and kill containers in the web ui of portainer. Each container also has quick action buttion:
- logs, to view container logs in real-time
- inspect, see detailed container configuration,
- stats, to monitor resource usage,
- console, to access container shell,
- start/stop, control container state as stated before
What I found the most useful one is logs button one in my case. Usually i use it to addressing specific problems (aka container debugging). With portainer logs feature, you can filter and search logs with keywords, export logs for analysis, and wrap lines to improve readability. You can also use regex patterns such as ERROR|WARN|FATAL on search function.
Additional Useful Features
Here is additional features that i find quite useful:
- Updating containers
- recreate with latest image
- using stacks (docker compose)
- Image Management
- pull new images from registries
- remove unused images
- view image layers and history
- Volume Management
- browse volume contents
- create backups
- attach/detach volumes from containers
- Network Inspection
- view network configurations
- see connected containers
- create custom networks
TLDR
Portainer transforms docker management from cli-based (docker commands) into more user-friendly visual intuitive experience. Portainer provides the tool you need to monitor, manage, and maintain your container easily especially with our “dockerize everything” approach. If you are comfortable with using docker commands (and on CLI), you dont need to use portainer.
Web Server & Reverse Proxy Setup
Now that as we introduced VPS for running our own server and portainer for docker management, next step is setting up a web server and reverse proxy. This setup is essential for hosting multiple websites or applications on a single server, enhancing security, and simplifying SSL certificate management. Even though there is plenty options to do reverse proxy and enable HTTPS such as traefik and caddy, we’ll be using the nginx , most popular one, to manage your web server and reverse proxy configurations.
PS: It’s worth noting that each of these tools (caddy and traefik) has its own unique philosophy and configuration method, so feel free to explore them and choose the one that you’re most comfortable with and that best suits your specific use case. For example, caddy is renowned for its incredibly simple and straightforward configuration with automatic HTTPS, while traefik excels in cloud-native environments with its ability to dynamically handle traffic for containerized applications.
Nginx Proxy Manager, Nginx with UI
Nginx Proxy Manager (NPM) is a game-changer for who want use nginx as reverse proxy engine without complexity of manual configuration files. Well actually to setup nginx is not really that complex and hard, but as first-timer (based on my experience, again), it might be a bit confusing first and NPM helps make the reverse proxies across all your apps and services easier (atleast). NPM provides a user-friendly web interface for managing nginx reverse proxy configurations, SSL, and access control. Lets just say that while we manage docker containers using portainer, we are managing nginx reverse proxies, SSL, and certificate using NPM.
Key advantages of using NPM:
- Simple SSL certificate setup, just click away for SSL configuration and there is automatic Let’s Encrypt SSL certificate generation and renewal
- With their visual configuration, no more editing nginx.conf files, you can manage everything through clean UI
- You can handle multiple domains and subdomains from a dashboard
- Access control, built-in auth and IP restrictions
- Real-time updates, changes apply immediately without manual reloads
- It’s docker native, it really suitable for our “dockerize everything” approach as its designed to work seamlessly in containerized environments
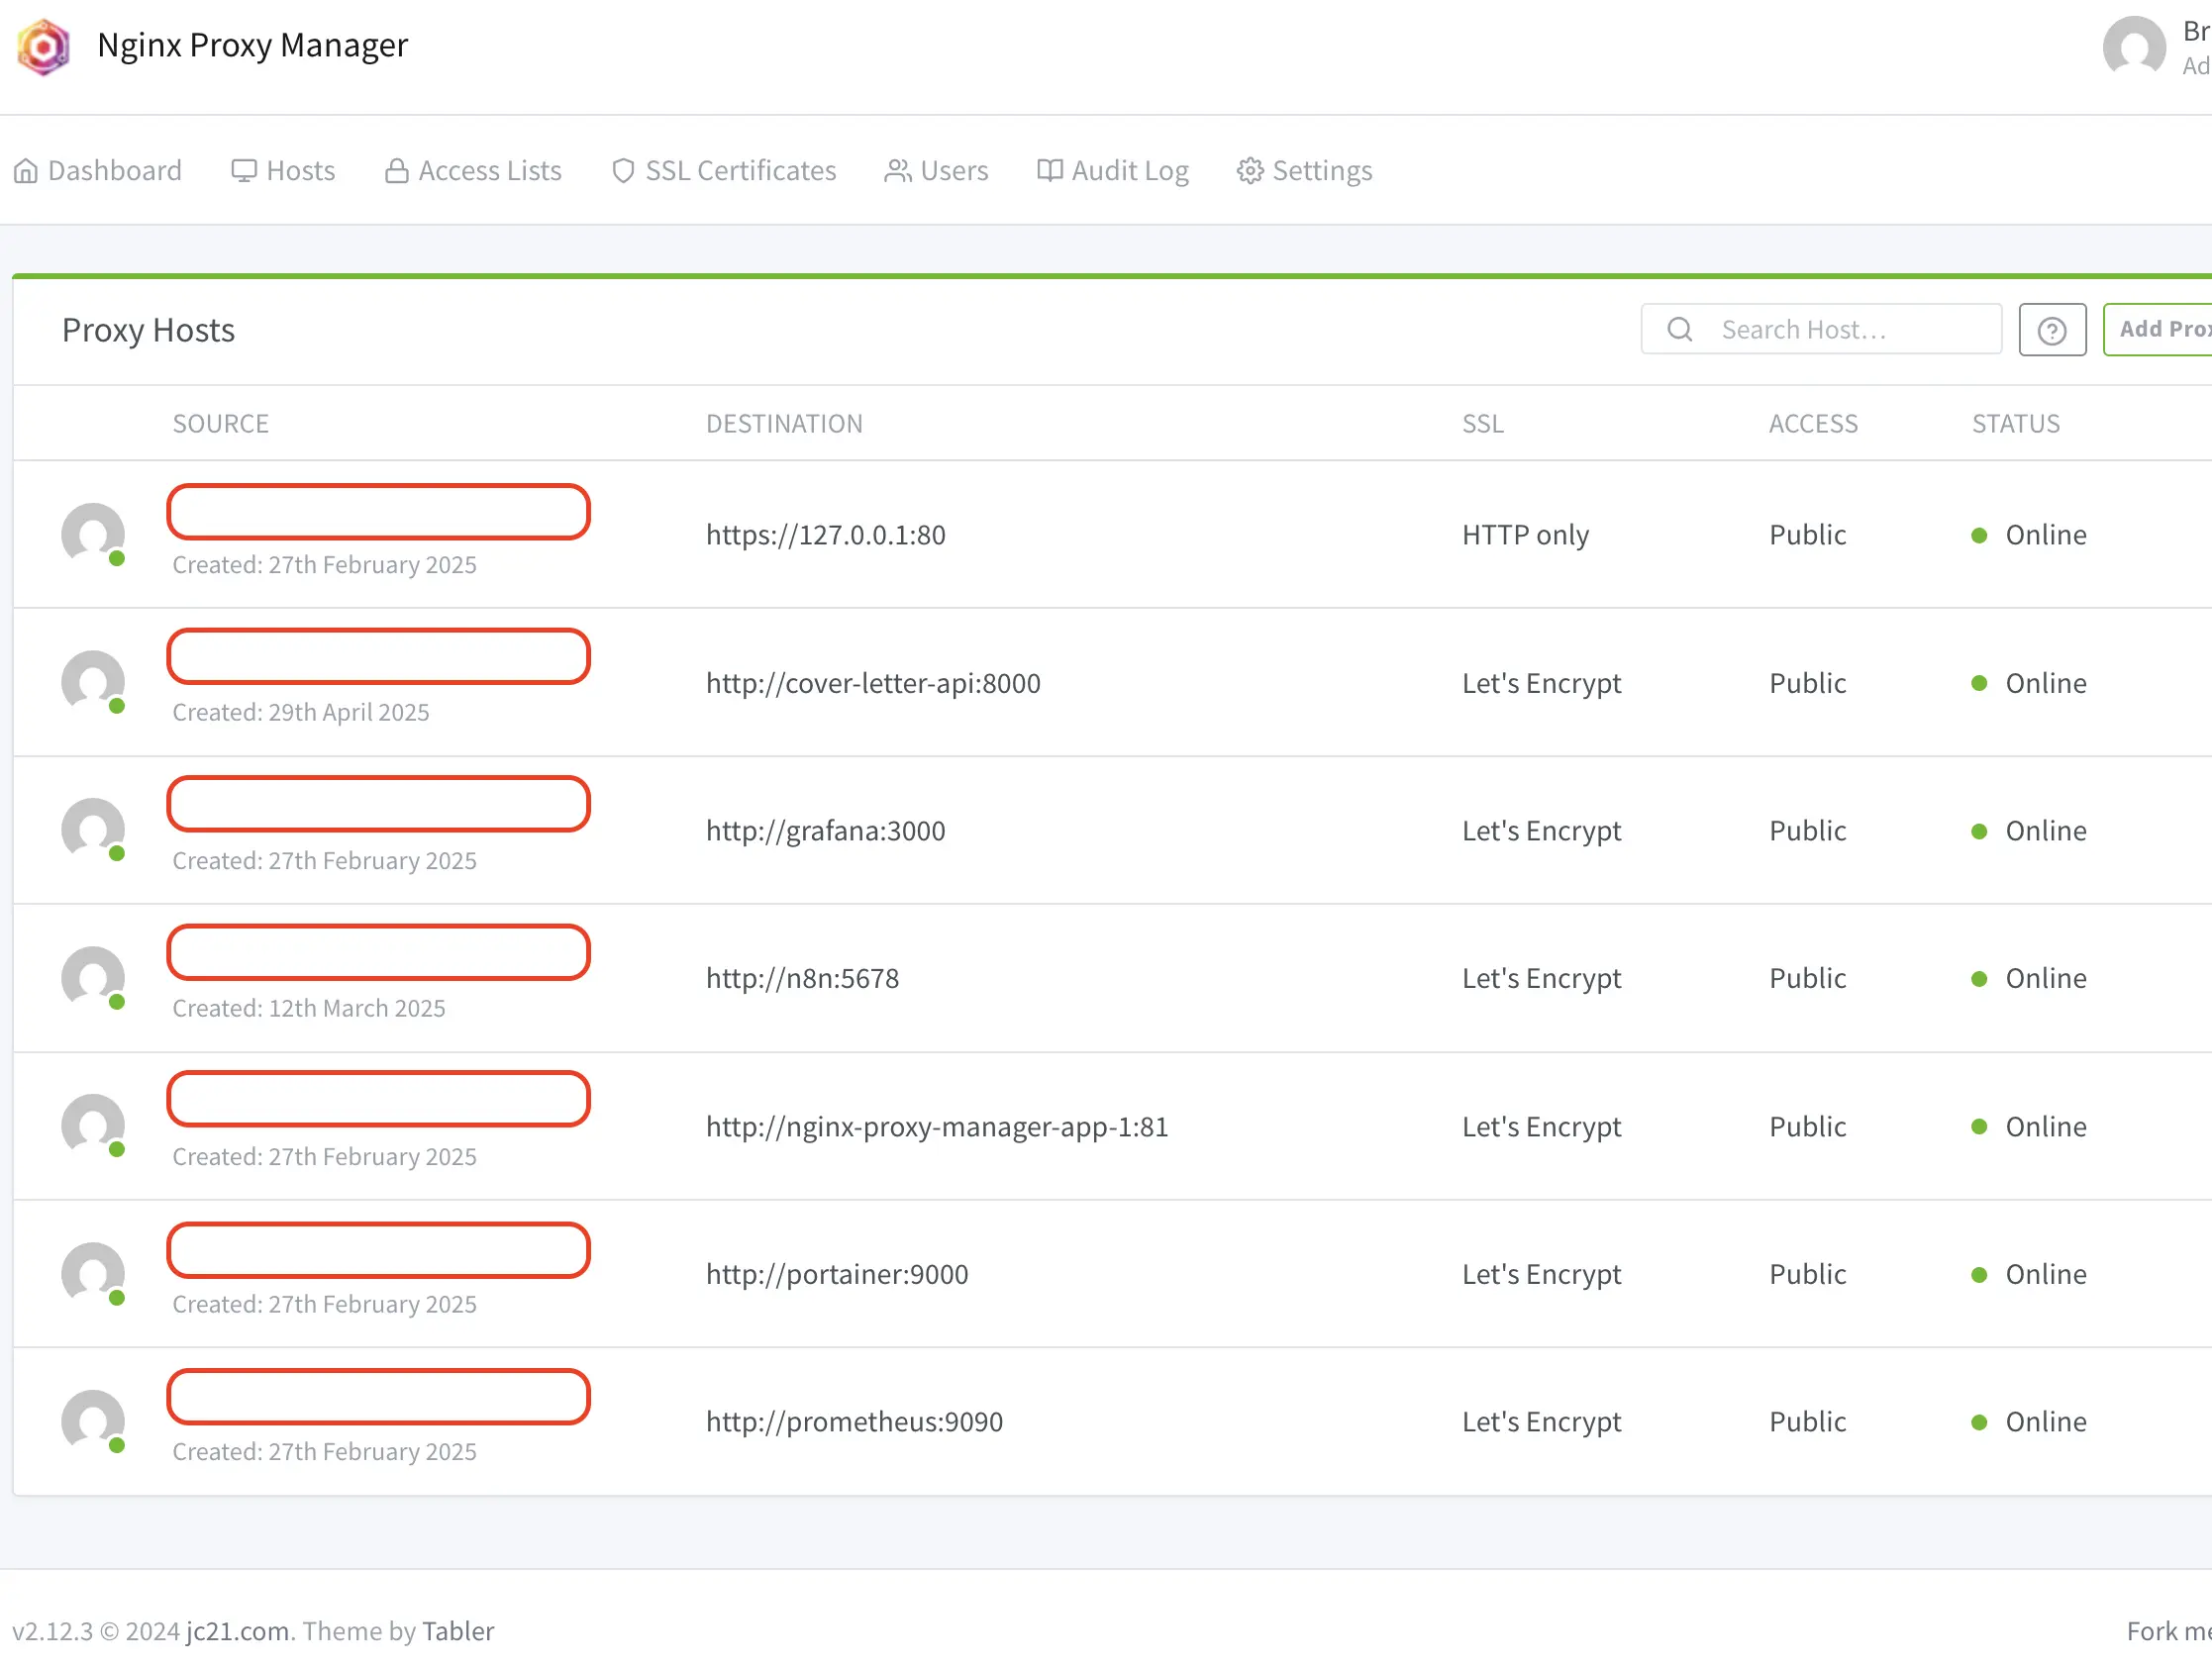
For installation and setup guide, you can check their official docs. After that, you can start reverse proxy your services/apps one by one through click like portainer using your own domain. Access NPM via http://<your-vps-ip>:81 then edit the proxy host, starting from your own NPM web server such as nginx.yourdomain.com.
Don’t forget to setup your DNS record before (actually you can do it after nginx configuration too lol, idk). I used cloudflare for their DNS record configuration and SSL certificate too. Let’s say i want to setup DNS server and reverse proxy the NPM & portainerwebserver using my domain, example.com (if you didnt buy your domain on cloudflare, migrate the DNS record setup from your domain provider to cloudflare, check their docs brah). Goes to cloudflare dashboard > select account and domain which is example.com > go to DNS then Records > select add record > choose a record type. Then fill it like this:
- Type:
A - Name:
nginx - IPv4:
123.45.678.91 #your vps ip address - Proxy status:
on - TTL:
Auto
After that access NPM (http://vps-ip:81) then select Proxy Hosts > select Add Proxy Host then fill it for example:
- Domain Names:
nginx.example.com - Scheme:
http - Forward Hostname/IP:
nginx-proxy-manager #your container name, vps ip, or docker network ip - Forward Port:
81 #your container port number
Then from Edit Proxy Host, goes to SSL then select Request a new SSL Certificate (we are using cloudflare for it). Then click Save. If the status is online, it should be working also make sure the access too wheever it’s public or private, if you select public, you know that other people can access your NPM (well there is sign in auth so you should’nt worry about that, unless..). For portainer is same too.
Cloudflare configs:
- Type:
A - Name:
portainer - IPv4:
123.45.678.91 #your vps ip address - Proxy status:
on - TTL:
Auto
NPM configs:
- Domain Names:
portainer.example.com - Scheme:
http - Forward Hostname/IP:
portainer #container name - Forward Port:
9000 #portainer default port
Thats it, more things you can do on NPM such as custom nginx configuration and adding location. Check their docs, ask LLM, and tinker it with yourself.

Setting Up Monitoring Stack

Now, monitoring setup and configuration on “Dockerize Everything” approach. We will wrap up all basic monitoring tools into orchestrated docker multi-containers using YAML file (docker compose). Monitoring on server is like having eyes and ears to see whats going on in your computer. Not having monitoring and observability on your server is like driving a car without dashboard, no speedometer, no fuel gauge, etc. If there is something going on your server, and you dont know whats wrong and what happened, you are going to be fucked.
Monitoring does provide curcial insights such as:
- Performance tracing to identify bottlenecks on your server, service, and application.
- Uptime monitoring, you will know immediately when services go down
- Debugging issues, historical data (ex: logs) helps trace when and why problems occured. This is one of key function of monitoring. How do you debug the issue if you dont know the root cause of issue itself on your server and service?
There is many more monitoring brings to the table such as capacity planning to understand your resource usage trends and business metrics to track application-specific KPIs that matter to your business.
For monitoring tools on our docker compose file in this example, we will use:
- Prometheus to collects and stores metrics as time-series data
- Grafana, visualization dashboard. We will use grafana to transforms raw metrics and logs data into
actionable insightbeautiful, glorious, understandable data visualization - Loki, log aggregation system also promtail to collect, label, and ship logs to loki instance.
- Node exporter, to check your systems metrics, ex: cpu, memory, disk, and network
As it will be too long to explain everything in details such as adding yaml file snippet and each monitoring configuration also I’m too lazy to write all of that tbh, here is github repo I made and already tested on vps for monitoring stuff that you can try it. You can directly clone the repo into your server, configure it by yourself and do docker compose -d up to run and start the containers.
In my github repo, I defined my prometheus configs which is scraping prometheus data, node exporter data, cadvisor, and my own app (cover letter generator for 10 seconds interval). You have to configure the prometheus to which container you want to scrape to receive their metrics data.
After starting portainer, NPM, and the entire monitoring stack, you can reverse proxy the server (also enable https) using your own domain through NPM such as grafana.example.com.
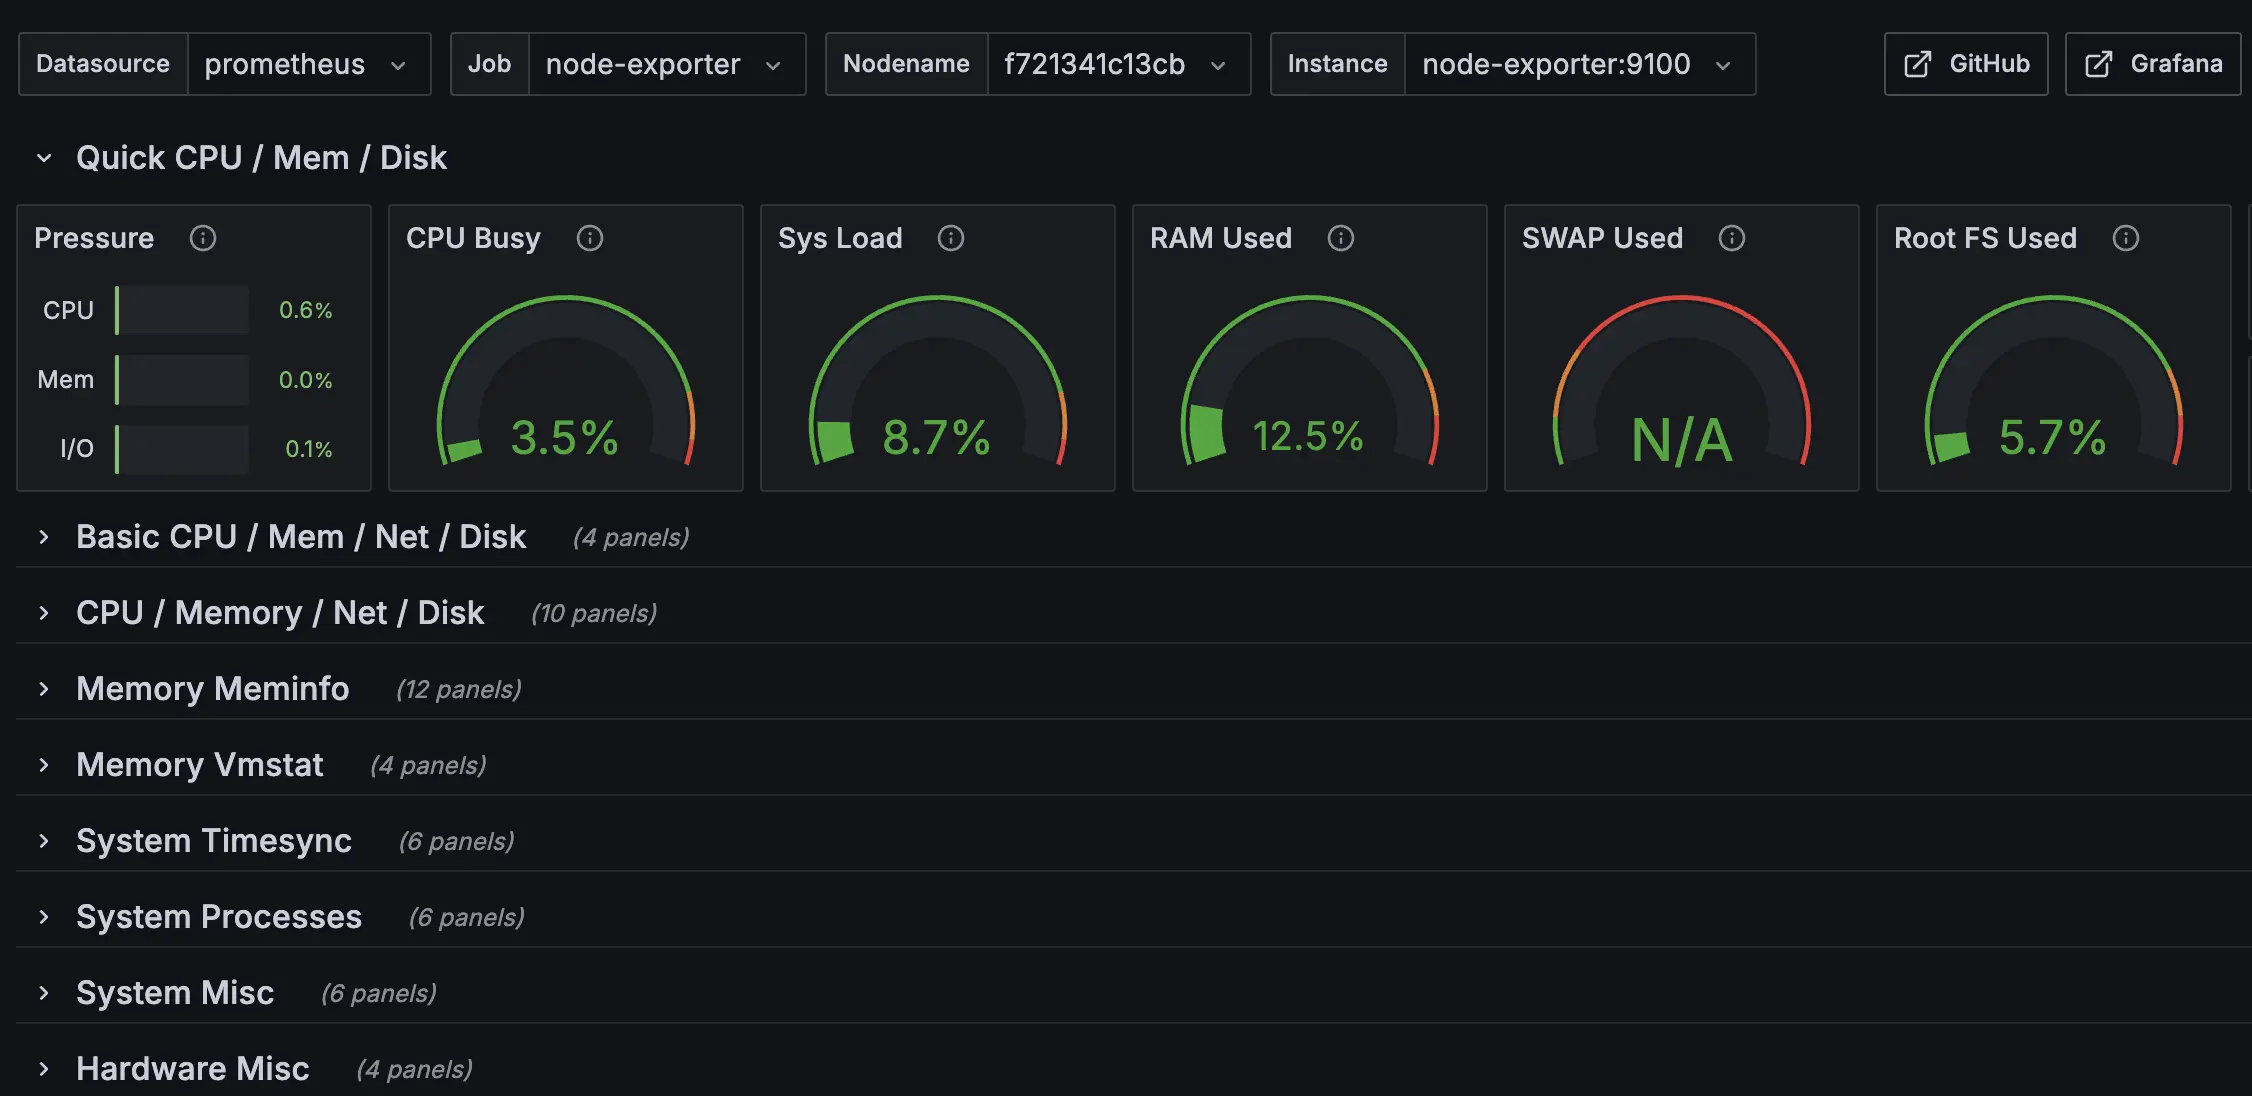
Then, setup your own grafana (login and password defined in .env.example file), add prometheus and loki as grafana data sources, then make your own dashboard there. You can also make grafana dashboard using JSON or copy dashboard ID from their template dashboard web. For example, to import node exporter dashboard for server resource monitoring, you can import 1860 then select Import Dashboard on grafana. You can integrate with many data sources on grafana too, such as SQL database to build SQL dashboard, elasticsearch, and DataDog, even SalesForce.
Self-Hosting & Deployment
As we have set up our docker infra with web server and basic monitoring, I’ll demonstrate two different deployment scenarios:
- Cover letter generator app: my app with FastAPI backend with HTMX as frontend
- Self-hosting open source app
Cover Letter Generator App
Cover Letter Generatoris simple app I made to generate personalized cover letter with LLM based on our CV, job description of company we target, target company name, and word limit preference. The architecture itself is monolithic design with frontend (HTMX with jinja2 as server side rendering template) and backend (FastAPI) in a single container. So port 8000 (FastAPI default server port) already serve both frontend and backend. Also if you wonder if I dont use database, yes there is no database there btw. For more details which is my repo, entire codebase, and docs, check here.
As you can see on my repo, there is dockerfile to build the application (install python > using uv as package manager and activate the VM > build tailwind css using npm for prod > expose app port which is 8000 also added health check). Then I defined two yml file for docker compose configs, which is local/dev environment and production environment. I added loki config in production env yml file which is:
x-logging: &default-logging
  driver: loki
  options:
    loki-url: "http://loki:3100/loki/api/v1/push"
    loki-pipeline-stages: |
      - multiline:
          firstline: '^\d{4}-\d{2}-\d{2} \d{1,2}:\d{2}:\d{2}'
          max_wait_time: 3s
      - regex:
          expression: '^(?P<time>\d{4}-\d{2}-\d{2} \d{1,2}:\d{2}:\d{2},\d{3}) (?P<message>(?s:.*))$$'
TLDR, it’s literally for loki logging pipeline as I integrated prometheus logging on my FastAPI backend code so we can monitor our own app on grafana through prometheus as data source.
So yeah, with our “Dockerize Everything” approach, you can easily ship your app (ex: API server, SaaS, etc.) easily with docker container. As the example above is single container, you can also make it 1 service = 1 container like separating frontend, backend, and database into three container for separate container management.
From Local to Server with Docker Hub
Deploying your apps from local to production doesnt have to be complicated like doing copypaste-ing your git repo or doing scp file command from your local environment to production by using docker hub. First, you need to have docker account and set it up on your environment. You can check their docs here. After that, here is the step by step process:
- Build your image locally by doing docker build using
docker build -t yourusername/your-app:v1.0.0 #you can do tagging like stable or latest too - Push to docker hub using
docker push yourusername/your-app:v1.0.0 - SSH to your server
- Pull the image with
docker pull yourusername/your-app:v1.0.0 - Run your container with
docker run -d -p 80:3000 --name your-app yourusername/your-app:v1.0.0 - Stop current version by
docker stop your-app && docker rm your-app - You can also run previous version with
docker run -d -p 80:3000 --name your-app yourusername/your-app:v0.6.9
Step above is just simple flow to demonstrate push and pull your docker image from local to your server with docker hub. Reminder that it only push and pull your docker image not entire stack like using docker compose command. You can add multiple tags to same image like latest, stable, and v1.0.0 without rebuilding. You can customize further with docker hub setup for your deployment process.
Self-Hosting
Now the crucial part of breaking free from closed-source platform and vendor lock-in enterprise cloud as you can tinker yourself in your server with free, amazing open-source apps available.
Most of open-source apps such as n8n (open-source zapier alternative), NocoDB (open-source airtable alternative), and Nextcloud (open-source google drive alternative) can be installed and deployed easily with docker. You can check curated list of open-source self-hosted projects that deployable with docker (and docker compose) in here.
Coolify as Alternative Self-Hosting Setup
If this self-host thing still sounds confusing, you can try vercel & heroku like app called Coolify that you can read here. Coolify deploys all applications as docker containers. You can deploy any languages (backends, APIs, databases, static sites), any docker-compatible services, automatically sets-up and renews SSL certificates for custom domains with git integration for deploying push. It also supports single servers, multi-server setups, and Docker Swarm clusters.
Using coolify might be other great starting point beside my approach here as coolify is standalone open source self-hosting platform (no vendor lock-in) so you only need to setup your own server then install coolify on your server and start deploying your apps or services.
Final Thoughts
As Im writing this blog to log my server & infra learning experience, this approach might not the best approach to manage your server especially for production-ready server that ready to scale, comprehensive, fully secure enough. Within this approach, I understand more about how container especially docker works and how to connect and manage containers in server through UIUX-friendly management (thanks to portainer and NPM). As I started this approach to learn about deploying apps on my own server few months ago. I do understand some of people annoyed with docker, even hate docker (as I was reading reddit thread and there is few people hate docker lmao). I might update this blog if I want to add something relevant to this blog sometime or if there is any crucial misinformation I wrote here. Even though, this approach seems “beginner friendly” in the beginning, it might have several weakness like build performances, not really lightweight, not really that effective, etc.
Recently, Im exploring many different deployment setups and strategies, especially more advanced and complex one. Currently, as I’m writing this, I found that nix is very great for server and infrastructure configuration with it’s philosophy design that I might write about that someday.
Start small and experiment it by yourself, as you understand better and get more comfortable tinkering with your own server, grow your setup progressively. Don’t forget to read the docs and watch some youtube videos to understand deeper and you can explore it by yourself what’s suitable more for you.